EExcel 丞燕快速查詢2

EExcel 丞燕快速查詢2 https://sandk.ffbizs.com/
[轉]Windows Server 2019 vs. Linux vs. FreeBSD Performance On A 2P EPYC Server
https://www.phoronix.com/scan.php?page=article&item=windows2019-linux-bsd&num=1&fbclid=IwAR0VBMPUsmOw_qJQtJ1AzEq4el8KhZMPK9sRmlMN8rLhwZJfFqO32RuefGI
[轉]FreeBSD ZFS vs. Linux EXT4/Btrfs RAID With Twenty SSDs
https://www.phoronix.com/scan.php?page=article&item=freebsd-12-zfs&num=1&fbclid=IwAR2utCninwUWUjjt_5IUu-1-rfm3vcCc1SiOvuZrYf4Bu0sW0HVsh9-lvQA
docker proxmox 使用方法
底層採用PVE(Proxmox),建立KVM VM,KVM VM使用docker-machine或是自建用boot2docker iso做好backup,使用時直接restore
docker 執行時 Restart policies:always,這樣VM開機就會自動執行,不需要另外再設定。
Volume 直接用docker-compose YAML volume減少權限問題,資料也會儲存在VM內,使用VM後,備份是以VM為主,不用擔心資料遺失
一個VM放多個docker、整組docker-compose 或 一個VM放單一功能docker可以自己決定
VM可以被快照保護,一但出問題,還原後、開完機,VM內的docker會自動起服務,資料也是存在的,減少docker backup&resotre問題
為了管理docker方便,第一次建立VM時,執行Portainer always,可以backup,將來每一個VM都可以利用圖形界面查看docker運作情況
缺點:
硬碟空間使用受限於KVM,擴充大小有可能需要重開機
線上移轉只能以VM,不能用docker,但docker設計上也不走線上移轉
為什麼需要用到docker呢?
因為現在很多專案有直接提供docker使用,確實可以減少大量安裝時間,
但volume資料儲存、權限卻是最大的問題,上述架構可以解決這部份顧慮。
docker backup
https://docs.docker.com/storage/volumes/#backup-restore-or-migrate-data-volumes
$ docker run --rm --volumes-from dbstore -v $(pwd):/backup ubuntu tar cvf /backup/backup.tar /dbdata
???
Real Demo Example:
mongo cantainer
  mongo:
    image: mongo
    #restart: always
    environment:
      MONGO_INITDB_ROOT_USERNAME: root
      MONGO_INITDB_ROOT_PASSWORD: example
    volumes:
      - alldata:/data/db
    networks:
      - fastdev
volumes is /data/db
docker running name is testbackup_mongo_1_1c9e49740f2e (this use docker ps check your run time docker name. Don't copy)
run
$ docker run --rm --volumes-from testbackup_mongo_1_1c9e49740f2e -v $(pwd):/backup ubuntu tar cvf /backup/backup.tar /data/db
ls -al can see backup.tar
README:
1. use ubuntu container link to mongo
2. mount $(pwd) path to ubuntu inside /backup directory. $(pwd) run command at path.
3. tar cvf "put where & filename" "what data be tar", So "put where & filename"=/backup/backup.tar "what data be tar"=/data/db
/data/db be tar write to backup.tar in /backup, then /backup be mount to $(pwd), you can see backup.tar put run command path.
acme let's encrypt
renew manually dns
acme.sh --issue -d *.oooxxx.com --dns --yes-I-know-dns-manual-mode-enough-go-ahead-please
Cer Key /root
cp ~/.acme.sh/\*.oooxxx.com/\*.oooxxx.com.cer  wildcardoooxxx.cer
cp ~/.acme.sh/\*.oooxxx.com/\*.oooxxx.com.cer  wildcardoooxxx.key
[轉]Proxmox VE - One Public IP
https://raymii.org/s/tutorials/Proxmox_VE_One_Public_IP.html
實例 https://www.facebook.com/groups/pve.tw/permalink/1225387670963125/
楊凱麟
以下也是我目前interfaces的設定
其中1.2.3.x為真實IP
1.2.3.Y為IDC提供的gateway
設置完後再將區網設定填上10.0.0.X (X=0~255)
即可上網,連外網的公共IP會是1.2.3.X
----network configuration----
auto lo
iface lo inet loopback
iface eno1 inet manual
auto vmbr0
iface vmbr0 inet static
address 1.2.3.X
netmask 255.255.255.248
network 1.2.3.0
broadcast 1.2.3.255
gateway 1.2.3.Y
bridge_ports eno1
bridge_stp off
bridge_fd 0
auto vmbr1
iface vmbr1 inet static
address 10.0.0.254
netmask 255.255.255.0
bridge_ports none
bridge_stp off
bridge_fd 0
post-up echo 1 > /proc/sys/net/ipv4/ip_forward
post-up iptables -t nat -A POSTROUTING -s '10.21.21.0/24' -o vmbr0 -j MASQUERADE
post-down iptables -t nat -D POSTROUTING -s '10.21.21.0/24' -o vmbr0 -j MASQUERADE
post-up iptables -t nat -A PREROUTING -i vmbr0 -p tcp --dport 2222 -j DNAT --to 10.21.21.5:22
post-down iptables -t nat -D PREROUTING -i vmbr0 -p tcp --dport 2222 -j DNAT --to 10.21.21.5:22
https://forum.proxmox.com/threads/pfsense-proxmox-5-one-nic.41512/#post-208059
==============
#############################
https://download.configserver.com/csf/readme.txt11. Multiple Ethernet Devices
實例 https://www.facebook.com/groups/pve.tw/permalink/1225387670963125/
楊凱麟
以下也是我目前interfaces的設定
其中1.2.3.x為真實IP
1.2.3.Y為IDC提供的gateway
設置完後再將區網設定填上10.0.0.X (X=0~255)
即可上網,連外網的公共IP會是1.2.3.X
----network configuration----
auto lo
iface lo inet loopback
iface eno1 inet manual
auto vmbr0
iface vmbr0 inet static
address 1.2.3.X
netmask 255.255.255.248
network 1.2.3.0
broadcast 1.2.3.255
gateway 1.2.3.Y
bridge_ports eno1
bridge_stp off
bridge_fd 0
auto vmbr1
iface vmbr1 inet static
address 10.0.0.254
netmask 255.255.255.0
bridge_ports none
bridge_stp off
bridge_fd 0
post-up echo 1 > /proc/sys/net/ipv4/ip_forward
post-up iptables -t nat -A POSTROUTING -s '10.21.21.0/24' -o vmbr0 -j MASQUERADE
post-down iptables -t nat -D POSTROUTING -s '10.21.21.0/24' -o vmbr0 -j MASQUERADE
post-up iptables -t nat -A PREROUTING -i vmbr0 -p tcp --dport 2222 -j DNAT --to 10.21.21.5:22
post-down iptables -t nat -D PREROUTING -i vmbr0 -p tcp --dport 2222 -j DNAT --to 10.21.21.5:22
https://forum.proxmox.com/threads/pfsense-proxmox-5-one-nic.41512/#post-208059
==============
- CSF firewall can focus vmbr2
#############################
https://download.configserver.com/csf/readme.txt11. Multiple Ethernet Devices
If you have multiple ethernet NICs that you want to apply all rules to, then you can set ETH_DEVICE to the interface name immediately followed by a plus sign. For example, eth+ will apply all iptables rules to eth0, eth1, etc.
That said, if you leave ETH_DEVICE blank all rules will be applied to all ethernet devices equally.
#############################
#############################
https://www.dmehosting.com/clients/knowledgebase.php?action=displayarticle&id=79&language=chinese
2. Edit /etc/csf/csf.conf, set the following parameters:
ETH_DEVICE = "venet0"
MONOLITHIC_KERNEL = "1"
VERBOSE = "0"
2. Edit /etc/csf/csf.conf, set the following parameters:
ETH_DEVICE = "venet0"
MONOLITHIC_KERNEL = "1"
VERBOSE = "0"
- CSF iptables nat
https://blackonsole.org/how-to-add-nat-iptables-rules-with-csf/
FireHOL iptables
FireHOL is a language (and a program to run it) which builds secure, stateful firewalls from easy to understand, human-readable configurations. The configurations stay readable even for very complex setups.
docker gui manager docker-machine portainer.io
https://www.portainer.io/
今天發現一個docker gui管理工具
https://www.portainer.io/
很符合簡單管理
先用docker-machine開一台機器,直接就是docker ready的VM ,VM可以是virtualbox等等
然後登入後,直接用 啟動 portainer的docker,管理這台機器上的docker
有圖形化介面,可以看到每一個docker使用情況,又可以直接登入到docker內,web terminal,這樣就有符合實際使用情況了
docker資料有用volume寫到本機vm內,再把整台vm打包備份的話,資料又不容易不見
docker run -d -p 9000:9000 --restart always -v /var/run/docker.sock:/var/run/docker.sock -v /opt/portainer:/data portainer/portainer
今天發現一個docker gui管理工具
https://www.portainer.io/
很符合簡單管理
先用docker-machine開一台機器,直接就是docker ready的VM ,VM可以是virtualbox等等
然後登入後,直接用 啟動 portainer的docker,管理這台機器上的docker
有圖形化介面,可以看到每一個docker使用情況,又可以直接登入到docker內,web terminal,這樣就有符合實際使用情況了
docker資料有用volume寫到本機vm內,再把整台vm打包備份的話,資料又不容易不見
[轉]致传统企业朋友:不够痛就别微服务,有坑
原始連結 https://mp.weixin.qq.com/s/tHRl5OQHY2mNXqKwACCVWw
非常不錯!
http://dockone.io/article/8390
非常不錯!
http://dockone.io/article/8390
docker問題
https://blog.csdn.net/u011166225/article/details/84940228
对于个人开发者来说,在一定情况下很好用。但是对于构建管理项目或者提供构建流程管理的Devops项目而言却是个灾难--本地存储结构不能对用户开放,它们也不能干扰用户本身的构建流程。所幸的是,Moby umbrella的开发团队注意到了这一点,他们希望通过重构存储管理和容器快照来解决一部分问题,于是BuildKit诞生了。
---------------------
作者:狗蛋丶
来源:CSDN
原文:https://blog.csdn.net/u011166225/article/details/84940228
版权声明:本文为博主原创文章,转载请附上博文链接!
对于个人开发者来说,在一定情况下很好用。但是对于构建管理项目或者提供构建流程管理的Devops项目而言却是个灾难--本地存储结构不能对用户开放,它们也不能干扰用户本身的构建流程。所幸的是,Moby umbrella的开发团队注意到了这一点,他们希望通过重构存储管理和容器快照来解决一部分问题,于是BuildKit诞生了。
---------------------
作者:狗蛋丶
来源:CSDN
原文:https://blog.csdn.net/u011166225/article/details/84940228
版权声明:本文为博主原创文章,转载请附上博文链接!
[轉]Centos7 容器中删除文件的问题
http://dockone.io/question/1516
巨坑!
Centos7默认xfs文件系统与docker默认overlay2存储驱动不匹配,会导致容器内文件无法删除等问题
https://blog.csdn.net/weixin_41826563/article/details/80549323
wx65251206
再次遇到这个问题,终于还是发扬刨根问题的精神,经过一上午的百度,google,bing
终于找到根本原因。
这里记录一下,为了帮助后面的人,同时也提醒自己。
问题原因与docker无关,在于linux内核版本。
测试有问题的内核版本是Red Hat 4.8.3-9---对应的发行版是CentOS7.2
巨坑!
Centos7默认xfs文件系统与docker默认overlay2存储驱动不匹配,会导致容器内文件无法删除等问题
https://blog.csdn.net/weixin_41826563/article/details/80549323
wx65251206
再次遇到这个问题,终于还是发扬刨根问题的精神,经过一上午的百度,google,bing
终于找到根本原因。
这里记录一下,为了帮助后面的人,同时也提醒自己。
问题原因与docker无关,在于linux内核版本。
测试有问题的内核版本是Red Hat 4.8.3-9---对应的发行版是CentOS7.2
ssh 反代
https://zhuanlan.zhihu.com/p/34908698
https://zaiste.net/ssh_port_forwarding/
這個動態有錯,測試不出來 (D 後查資料,變成是proxy socket方式,給porxy使用,這裡不需要這個設定)

內網主機A 外網主機B
內網主機A 設定:
20000: 遠端打算 打開的port
localhost:80 :指目前 內網主機A上的服務port,或是其他主機和port也可以,只要是A主機連得到的
xxx :B user id
xxx.ooo.xxx.ooo :B ip
PS:這個連上後,可以在 B上試 curl localhost:20000是否會通,不通則代表沒有建立成功或是該服務不接受連線,測試連線位址只限用localhost本地
PS:-g是別人(所有人)可以連,但 -NR + g => -gNR 經測試是無效的
外網主機B:
這裡最主要目的是開放 20000開放讓所有人可以連,但實際上2000已經被反向代理使用中,也被限制住了(localhost),所以
變成 開放 30002 讓別人(所有人)可以連,透過30002轉向20000
-gL : -g 開放給別人連(所有人):這裡和教學不同,教學用D,試是失敗的 (D 後查資料,變成是proxy socket方式,給porxy使用,這裡不需要這個設定)
30002: 指外網主機B 打算開那個port 給人用
localhost: 這裡指的都是 外網主機B
20000:最上面操作時,在外網主機B 開的port
A 80 -> B 20000 <-> 30002 <- outside people
The -nNT flags will cause SSH to not allocate a tty and only do the port forwarding.
======
https://superuser.com/questions/408031/differences-between-ssh-l-to-d
https://explainshell.com/explain?cmd=ssh+-L+-N+-f+-l
Differences between ssh -L to -D
ssh -L opens a local port. Everything that you send to that port is put through the ssh connection and leaves through the server. If you do, e.g., ssh -L 4444:google.com:80, if you open http://localhost:4444 on your browser, you'll actually see google's page.
ssh -D opens a local port, but it doesn't have a specific endpoint like with -L. Instead, it pretends to be a SOCKS proxy. If you open, e.g., ssh -D 7777, when you tell your browser to use localhost:7777 as your SOCKS proxy, everything your browser requests goes through the ssh tunnel. To the public internet, it's as if you were browsing from your ssh server instead of from your computer.
Specifies a local “dynamic” application-level port forwarding. This works by allocating a socket to listen to port on the local side, optionally bound to the specified bind_address. Whenever a connection is made to this port, the connection is forwarded over the secure channel, and the application protocol is then used to determine where to connect to from the remote machine. Currently the SOCKS4 and SOCKS5 protocols are supported, and ssh will act as a SOCKS server. Only root can forward privileged ports. Dynamic port forwardings can also be specified in the configuration file.
==== become ssh tunnel service
https://kauri.io/make-use-of-your-remote-ethereum-node-using-an-ssh-tunnel-and-metamask/348d6c66da2949978c85bf2cd913d0ac/a
https://zaiste.net/ssh_port_forwarding/

內網主機A 外網主機B
內網主機A 設定:
ssh -NR 20000:localhost:80 xxxx@xxx.ooo.xxx.ooo
20000: 遠端打算 打開的port
localhost:80 :指目前 內網主機A上的服務port,或是其他主機和port也可以,只要是A主機連得到的
xxx :B user id
xxx.ooo.xxx.ooo :B ip
PS:這個連上後,可以在 B上試 curl localhost:20000是否會通,不通則代表沒有建立成功或是該服務不接受連線,測試連線位址只限用localhost本地
PS:-g是別人(所有人)可以連,但 -NR + g => -gNR 經測試是無效的
外網主機B:
這裡最主要目的是開放 20000開放讓所有人可以連,但實際上2000已經被反向代理使用中,也被限制住了(localhost),所以
變成 開放 30002 讓別人(所有人)可以連,透過30002轉向20000
ssh -gL 30002:localhost:20000 localhost
-gL : -g 開放給別人連(所有人):這裡和教學不同,教學用D,試是失敗的 (D 後查資料,變成是proxy socket方式,給porxy使用,這裡不需要這個設定)
30002: 指外網主機B 打算開那個port 給人用
localhost: 這裡指的都是 外網主機B
20000:最上面操作時,在外網主機B 開的port
A 80 -> B 20000 <-> 30002 <- outside people
The -nNT flags will cause SSH to not allocate a tty and only do the port forwarding.
$ ssh -nNT -L 9000:imgur.com:80 user@example.com
======
https://superuser.com/questions/408031/differences-between-ssh-l-to-d
https://explainshell.com/explain?cmd=ssh+-L+-N+-f+-l
Differences between ssh -L to -D
ssh -L opens a local port. Everything that you send to that port is put through the ssh connection and leaves through the server. If you do, e.g., ssh -L 4444:google.com:80, if you open http://localhost:4444 on your browser, you'll actually see google's page.
ssh -D opens a local port, but it doesn't have a specific endpoint like with -L. Instead, it pretends to be a SOCKS proxy. If you open, e.g., ssh -D 7777, when you tell your browser to use localhost:7777 as your SOCKS proxy, everything your browser requests goes through the ssh tunnel. To the public internet, it's as if you were browsing from your ssh server instead of from your computer.
Specifies a local “dynamic” application-level port forwarding. This works by allocating a socket to listen to port on the local side, optionally bound to the specified bind_address. Whenever a connection is made to this port, the connection is forwarded over the secure channel, and the application protocol is then used to determine where to connect to from the remote machine. Currently the SOCKS4 and SOCKS5 protocols are supported, and ssh will act as a SOCKS server. Only root can forward privileged ports. Dynamic port forwardings can also be specified in the configuration file.
==== become ssh tunnel service
https://kauri.io/make-use-of-your-remote-ethereum-node-using-an-ssh-tunnel-and-metamask/348d6c66da2949978c85bf2cd913d0ac/a
$ cat > persistent.ssh.tunnel.service <<EOF
[Unit]
Description=Persistent SSH Tunnel

[Service]
User=user
Type=simple
Restart=always
ExecStartPre=/bin/sleep 10
ExecStart=/usr/bin/ssh -N -v user@172.16.389.54 -L 8545:localhost:8545

[Install]
WantedBy=default.target
EOF
$ sudo mv persistent.ssh.tunnel.service /etc/systemd/system/
$ sudo systemctl daemon-reload
$ sudo systemctl enable persistent.ssh.tunnel.service
$ sudo systemctl start persistent.ssh.tunnel.service
sudo systemctl status persistent.ssh.tunnel.service
ethereum metamask chrome use detail and becarful
1. You want to clean all data, just remove metamask then reinstall chrome extend again. Sometime do this step, can finish many problems.
2. use private china (private network). If you reconnect failed or miss connect,

3. private network best good action is

Sometime you sure private network is work and ok. But check netowrks list failed, this time just redo Custome Network then everything is ok.
4. How to know private network have web3 and ok?
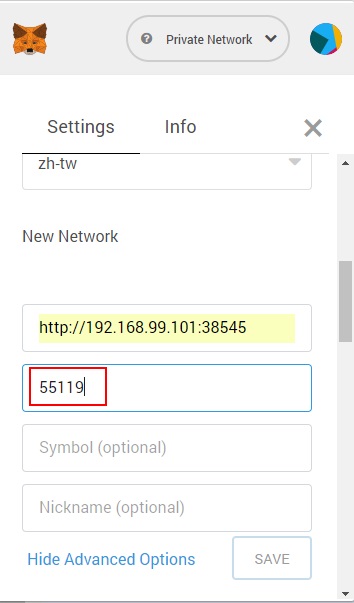
Just broswer web EX:http://192.168.9.10:38545 get 200 ok, sure web3 is ok.
5. geth rpc be careful
Fire time Open everything:--rpcapi "db,admin,debug,miner,personal,txpool,eth,net,web3" --rpc --rpcaddr "0.0.0.0" --rpccorsdomain "*" --rpcvhosts=*
check ok then remove or fix setting. EX:fix 0.0.0.0 => 140.140.140.140 then check again. If can't connect, you know which parms have problems.
6. smart contract
https://remix.ethereum.org/
https://solidity.readthedocs.io/en/v0.5.2/introduction-to-smart-contracts.html#simple-smart-contract
This example is simple for test.

use injected Web3 that call metamask. I try use Web3 Provide always failed. Don't wast time.
Error: invalid sender get this error. metamask custome network have one option
Try to put, sure connect, Then remove........ problem is this.
Why try put and remove. Because I try to put smart contract, get this message, then put chain id. Still get error message. Then I test for remove again, test private is ok or not. This time is success..........
PS:reload remix ethereum website maybe can fix bug
7. Why are MetaMask transactions taking a long time? MetaMask 交易為何十分耗時?
To ensure transactions are received in the correct order, each Ethereum transaction comes with an incrementing nonce. If you've used an account in MetaMask on a different network, you'll need to reset the nonce value. Click on the settings icon (3-bars), Settings, Reset Account. The transaction history will be cleared and now you can resubmit the transaction.
為了確保能夠以正確的順序接收交易,每個以太坊交易都會隨附累加的 nonce。 如果您將 MetaMask 中的帳戶用於不同的網路上,則必須重設 nonce 值。 請依序按一下設定圖示 (3 橫列) [設定]、[重設帳戶]。 交易歷程記錄將會清除,屆時您即可重新提交交易。
https://docs.microsoft.com/zh-tw/azure/blockchain/templates/ethereum-poa-deployment#why-are-metamask-transactions-taking-a-long-time
8. Do I need to specify gas fee in MetaMask? 我是否需要在 MetaMask 中指定燃料費?
Ether doesn't serve a purpose in proof-of-authority consortium. Hence there is no need to specify gas fee when submitting transactions in MetaMask.
乙太幣在權威證明聯盟中派不上用場。 因此,在於 MetaMask 中提交交易時,無須指定燃料費。
https://docs.microsoft.com/zh-tw/azure/blockchain/templates/ethereum-poa-deployment#why-are-metamask-transactions-taking-a-long-time
2. use private china (private network). If you reconnect failed or miss connect,

3. private network best good action is

Sometime you sure private network is work and ok. But check netowrks list failed, this time just redo Custome Network then everything is ok.
4. How to know private network have web3 and ok?
Just broswer web EX:http://192.168.9.10:38545 get 200 ok, sure web3 is ok.
5. geth rpc be careful
Fire time Open everything:--rpcapi "db,admin,debug,miner,personal,txpool,eth,net,web3" --rpc --rpcaddr "0.0.0.0" --rpccorsdomain "*" --rpcvhosts=*
check ok then remove or fix setting. EX:fix 0.0.0.0 => 140.140.140.140 then check again. If can't connect, you know which parms have problems.
6. smart contract
https://remix.ethereum.org/
https://solidity.readthedocs.io/en/v0.5.2/introduction-to-smart-contracts.html#simple-smart-contract
This example is simple for test.

use injected Web3 that call metamask. I try use Web3 Provide always failed. Don't wast time.
Error: invalid sender get this error. metamask custome network have one option
Try to put, sure connect, Then remove........ problem is this.

Why try put and remove. Because I try to put smart contract, get this message, then put chain id. Still get error message. Then I test for remove again, test private is ok or not. This time is success..........
PS:reload remix ethereum website maybe can fix bug
7. Why are MetaMask transactions taking a long time? MetaMask 交易為何十分耗時?
To ensure transactions are received in the correct order, each Ethereum transaction comes with an incrementing nonce. If you've used an account in MetaMask on a different network, you'll need to reset the nonce value. Click on the settings icon (3-bars), Settings, Reset Account. The transaction history will be cleared and now you can resubmit the transaction.
為了確保能夠以正確的順序接收交易,每個以太坊交易都會隨附累加的 nonce。 如果您將 MetaMask 中的帳戶用於不同的網路上,則必須重設 nonce 值。 請依序按一下設定圖示 (3 橫列) [設定]、[重設帳戶]。 交易歷程記錄將會清除,屆時您即可重新提交交易。
https://docs.microsoft.com/zh-tw/azure/blockchain/templates/ethereum-poa-deployment#why-are-metamask-transactions-taking-a-long-time
8. Do I need to specify gas fee in MetaMask? 我是否需要在 MetaMask 中指定燃料費?
Ether doesn't serve a purpose in proof-of-authority consortium. Hence there is no need to specify gas fee when submitting transactions in MetaMask.
乙太幣在權威證明聯盟中派不上用場。 因此,在於 MetaMask 中提交交易時,無須指定燃料費。
https://docs.microsoft.com/zh-tw/azure/blockchain/templates/ethereum-poa-deployment#why-are-metamask-transactions-taking-a-long-time
年輕人
https://www.mobile01.com/topicdetail.php?f=291&t=5107288&p=1085#10849
以你的情況,我可以給你明確的做法
1、絕對不要把錢放活存,如果你的錢就動態需要的,你開一個richart的帳戶,活存能有1%
2、如果你這40萬是要存下來的,之前有同事和我說她手上有幾十萬該怎麼投資,我回她目前中美貿易戰,fed升息局勢不好,所以不要急著投資股市,可以把錢放美金定存,由於我慣用的銀行是中國信託,我和她說定存1個半月後,再解定存轉美金優存能有2.8%,上星期五我看已經有3%了,她已經定存了一年,大約幾十萬到美金3%中。
3、她和她老公手上還有一些閒錢,每個月會有薪資進來,所以目前會抽特別股,大概會是3.5%~5%,風險是公司若沒有賺錢,也許當年不會發利息出來,好處是股價不會變動,很適合未經訓練的新手,因為股價不會變動,所以不會產生貪婪及恐懼亂買,亂賣損失手續費、交易稅及差價。
4、假日六、日選一天到圖書館看理財的書,選一天到運動或到山中爬山,做這兩件事可以減少你的開銷,也可以讓你的身體更健康,更可以強化你的心靈,平常日有空多走路,走路會讓你的頭腦更強化,讓你閱讀更有效率,我連續十幾年上班坐公車,下班走路,風雨無阻,如果你家離公司太遠,晚上可以到公園走路,把一些youtube財經節目轉成mp3放到手機中,一邊走一邊聽。
5、專注你的本業,讓你的薪資可以再提升,每個月,每年讓你的戶頭變大,當你一邊存錢,一邊看理財書時,你可以虛擬的買一些股票試試,虛擬的壞處是無法練訓自我心理面,畢竟你辛苦存的40萬賠3萬,和虛擬的40萬賠3萬壓力是不同的,但至少你可以練習交易的感覺,也可以練你投資的眼光,當你的虛擬帳戶開始賺錢後再進來股市,但我個人建議,你去圖書館看書時,先選如何看懂財報的書,像什麼二十萬賺1億,永遠不敗術,躺著賺錢…等,這種書你就先別看,心法、技術面的書也都先別看,先把基本面打好,在做虛擬投資時先試著報看公司的財報,然後評估股價的價值,然後像我一樣研究,觀察,記錄。
如果4、5你辨不到,覺得太多事要做了,你不是這塊料,那你就先執行1~3,最後你找機會在10年線下再買0050,以後就分批買進,你可以得到該有的報酬,每年也許可以得到3~4%的股息,如果買的時間點對,也許還能賺到一點點的差價,如果你到40以後,你真的很想要房子,車子及兒子,認命一點的工作到六十五,退休時應該能存個幾萬百退休金,如果你不要房子、車子及兒子,也許你40~50就能退休了,目前的年輕人被這個世界逼到要懂的選擇,不要傻乎乎的聽老一輩的人說什麼快結緍,快生小孩,要結緍前要先買房子然後揹三十年或四十年房貸,有了小孩後要買車子代步,對於一個平凡的人,要這三樣東西會讓你40歲前的人生變黑白,甚至50歲前人生變黑白,只要30歲沒有富爸爸的資助,沒有過人的資薪,你買房子、車子或生兒子是讓你接下來人生悲慘的開始。
房子及車子是給懂得玩金錢遊戲的人擁有的,這很悲哀但卻是事實,房子在全世界並不是拿來住的,而是拿來炒作的~
dcoker helpful command shell part 2
dpsrm < pattern docker cantainer name >
#!/bin/sh
IFS=$'\n'
echo $1

docker ps -a --no-trunc  | grep $1 | awk '{print $1}' | xargs -r --no-run-if-empty docker stop
docker ps -a --no-trunc  | grep $1 | awk '{print $1}' | xargs -r --no-run-if-empty docker rm
docker rmi -f $(docker images | grep $1 | awk '{print $3}')
[轉]My list of helpful docker commands
https://gist.github.com/garystafford/f0bd5f696399d4d7df0f
docker exec -it $(docker container ls | grep 'pattern' | awk '{print $1}') bin/bash

docker ps -a --no-trunc  | grep 'pattern' | awk '{print $1}' | xargs -r --no-run-if-empty docker rm

docker images -a | grep 'pattern' | awk '{print $3}' | xargs docker rmi
###############################################################################
# Helpful Docker commands and code snippets
###############################################################################

### CONTAINERS ###
docker stop $(docker ps -a -q) #stop ALL containers
docker rm -f $(docker ps -a -q) # remove ALL containers
docker rm -f $(sudo docker ps --before="container_id_here" -q) # can also filter

# exec into container
docker exec -it $(docker container ls  | grep '' | awk '{print $1}') sh
# exec into container on windows with Git Bash
winpty docker exec -it $(docker container ls  | grep '' | awk '{print $1}') sh

# helps with error: 'unexpected end of JSON input'
docker rm -f $(docker ps -a -q) # Remove all in one command with --force
docker exec -i -t "container_name_here" /bin/bash # Go to container command line

# to exit above use 'ctrl p', 'ctrl q' (don't exit or it will be in exited state)
docker rm $(docker ps -q -f status=exited) # remove all exited containers

### IMAGES ###
# list images and containers
docker images | grep "search_term_here"

# remove image(s) (must remove associated containers first)
docker rmi -f image_id_here # remove image(s)
docker rmi -f $(docker images -q) # remove ALL images!!!
docker rmi -f $(docker images | grep "^" | awk '{print $3}') # remove all  images
docker rmi -f $(docker images | grep 'search_term_here' | awk '{print $1}') # i.e. 2 days ago
docker rmi -f $(docker images | grep 'search_1\|search_2' | awk '{print $1}')

### DELETE BOTH IMAGES AND CONTAINERS ###
docker images && docker ps -a
# stop and remove containers and associated images with common grep search term
docker ps -a --no-trunc  | grep "search_term_here" | awk "{print $1}" | xargs -r --no-run-if-empty docker stop && \
docker ps -a --no-trunc  | grep "search_term_here" | awk "{print $1}" | xargs -r --no-run-if-empty docker rm && \
docker images --no-trunc | grep "search_term_here" | awk "{print $3}" | xargs -r --no-run-if-empty docker rmi

# stops only exited containers and delete only non-tagged images
docker ps --filter 'status=Exited' -a | xargs docker stop docker images --filter "dangling=true" -q | xargs docker rmi

### DELETE NETWORKS AND VOLUMES ###
# clean up orphaned volumes
docker volume rm $(docker volume ls -qf dangling=true)

# clean up orphaned networks
docker network rm $(docker network ls -q)

### NEW IMAGES/CONTAINERS ###
# create new docker container, ie. ubuntu
docker pull ubuntu:latest # 1x pull down image
docker run -i -t ubuntu /bin/bash # drops you into new container as root

### OTHER ###
# install docker first using directions for installing latest version
# https://docs.docker.com/installation/ubuntulinux/#ubuntu-trusty-1404-lts-64-bit

# other great tips: http://www.centurylinklabs.com/15-quick-docker-tips/
# fix fig / docker config: https://gist.github.com/RuslanHamidullin/94d95328a7360d843e52
gitlab old version backup restore upgrade
check version http://xxx.xxx.xxx.xxx/help
1. https://packages.gitlab.com/gitlab/gitlab-ce
2. example https://packages.gitlab.com/gitlab/gitlab-ce/packages/el/7/gitlab-ce-9.5.4-ce.0.el7.x86_64.rpm
ps: https://docs.gitlab.com/omnibus/manual_install.html
3. http://sueboy.blogspot.com/2018/12/gitlab.html
sudo nano /etc/gitlab/gitlab.rb
可以在裡面找到external_url
sudo gitlab-ctl reconfigure
sudo gitlab-ctl status
4. open firewall
firewall-cmd --zone=public --add-port=80/tcp --permanent
firewall-cmd --list-all --permanent
5. backup restore
https://docs.gitlab.com/ee/raketasks/backup_restore.html
https://gitlab.com/gitlab-org/gitlab-ce/blob/master/doc/raketasks/backup_restore.md
6. upgrade
https://docs.gitlab.com/omnibus/update/
gitlab Maintenance Policy Upgrade recommendations
https://docs.gitlab.com/ee/policy/maintenance.html#upgrade-recommendations
9.5 to 10
https://gitlab.com/gitlab-org/gitlab-ce/blob/master/doc/update/9.5-to-10.0.md
================================
目前已經在測試環境模擬過,安全可行方式:
事先準備:
1. https://packages.gitlab.com/gitlab/gitlab-ce
2. example https://packages.gitlab.com/gitlab/gitlab-ce/packages/el/7/gitlab-ce-9.5.4-ce.0.el7.x86_64.rpm
curl -s https://packages.gitlab.com/install/repositories/gitlab/gitlab-ce/script.rpm.sh | sudo bash
sudo yum install gitlab-ce-9.5.4-ce.0.el7.x86_64
ps: https://docs.gitlab.com/omnibus/manual_install.html
3. http://sueboy.blogspot.com/2018/12/gitlab.html
sudo nano /etc/gitlab/gitlab.rb
可以在裡面找到external_url
sudo gitlab-ctl reconfigure
sudo gitlab-ctl status
4. open firewall
firewall-cmd --zone=public --add-port=80/tcp --permanent
firewall-cmd --list-all --permanent
5. backup restore
https://docs.gitlab.com/ee/raketasks/backup_restore.html
https://gitlab.com/gitlab-org/gitlab-ce/blob/master/doc/raketasks/backup_restore.md
6. upgrade
https://docs.gitlab.com/omnibus/update/
gitlab Maintenance Policy Upgrade recommendations
https://docs.gitlab.com/ee/policy/maintenance.html#upgrade-recommendations
9.5 to 10
https://gitlab.com/gitlab-org/gitlab-ce/blob/master/doc/update/9.5-to-10.0.md
================================
目前已經在測試環境模擬過,安全可行方式:
- 建立一台新的centos
- 灌gitlab 9.5.4,還原 目前9.5.4,確認是否能正常執行gitlab
- 開始升級 9.5.4 -> 11.5.5 會失敗,必需 9.5.4 -> 9.5.10 -> 10.8.7 -> 11.3.4 -> 11.5.5,必需按照這個步驟升級4次
- gitlab 11.5.5升級完後,請人員操作測試是否有問題,沒問題後,再把舊的關閉,切換ip
事先準備:
- 升級過程大概需要4小時以上的時間
- 原本gitlab匯出後,不可以再新增資料
A script to backup GitLab repositories.
https://gist.github.com/avence12/70fc35963444d096d1bdb558b252327a
https://www.lightblue.asia/gitlab-backup-script/?doing_wp_cron=1545378263.6541728973388671875000
Change:
1. http token: kzy3x2TSeukztpvzBiYA token from gitlab Personal Access Token, Don't use Account Private Tokens. Need to product Personal Access Token
PS:GLAB_TOKEN use in GLAB_PROJ_API, Personal Access Token or Account Private Tokens both is ok
2. REPO have bug:REPO have " must remove, so add line under
https://stackoverflow.com/questions/13570327/how-to-delete-a-substring-using-shell-script
3.
GLAB_GITHOST、GLAB_API have gitlab.com change => ip:port or domain
ALL
https://www.lightblue.asia/gitlab-backup-script/?doing_wp_cron=1545378263.6541728973388671875000
Change:
1. http token: kzy3x2TSeukztpvzBiYA token from gitlab Personal Access Token, Don't use Account Private Tokens. Need to product Personal Access Token
GLAB_GIT_CLONE_CMD="git clone --quiet --mirror git@${GLAB_GITHOST}:"
GLAB_GIT_CLONE_CMD="git clone --quiet --mirror http://oauth2:${GLAB_TOKEN}@${GLAB_GITHOST}/"
PS:GLAB_TOKEN use in GLAB_PROJ_API, Personal Access Token or Account Private Tokens both is ok
2. REPO have bug:REPO have " must remove, so add line under
https://stackoverflow.com/questions/13570327/how-to-delete-a-substring-using-shell-script
for REPO in $REPOLIST; do
for REPO in $REPOLIST; do
  REPO=${REPO%\"}
3.
GLAB_GITHOST、GLAB_API have gitlab.com change => ip:port or domain
ALL
#!/bin/bash
# A script to backup GitLab repositories.

GLAB_BACKUP_DIR=${GLAB_BACKUP_DIR-"gitlab_backup"}                   # where to place the backup files
GLAB_TOKEN=${GLAB_TOKEN-"YOUR_TOKEN"}        #kzy3x2TSeukztpvzBiYA   # the access token of the account
GLAB_GITHOST=${GLAB_GITHOST-"gitlab.com"}                            # the GitLab hostname
GLAB_PRUNE_OLD=${GLAB_PRUNE_OLD-true}                                # when `true`, old backups will be deleted
GLAB_PRUNE_AFTER_N_DAYS=${GLAB_PRUNE_AFTER_N_DAYS-7}                 # the min age (in days) of backup files to delete
GLAB_SILENT=${GLAB_SILENT-false}                                     # when `true`, only show error messages
GLAB_API=${GLAB_API-"https://gitlab.com/api/v3"}                     # base URI for the GitLab API
GLAB_GIT_CLONE_CMD="git clone --quiet --mirror git@${GLAB_GITHOST}:" # base command to use to clone GitLab repos

TSTAMP=`date "+%Y%m%d"`

# The function `check` will exit the script if the given command fails.
function check {
  "$@"
  status=$?
  if [ $status -ne 0 ]; then
    echo "ERROR: Encountered error (${status}) while running the following:" >&2
    echo "           $@"  >&2
    echo "       (at line ${BASH_LINENO[0]} of file $0.)"  >&2
    echo "       Aborting." >&2
    exit $status
  fi
}

# The function `tgz` will create a gzipped tar archive of the specified file ($1) and then remove the original
function tgz {
   check tar zcf $1.tar.gz $1 && check rm -rf $1
}

$GLAB_SILENT || (echo "" && echo "=== INITIALIZING ===" && echo "")

$GLAB_SILENT || echo "Using backup directory $GLAB_BACKUP_DIR"
check mkdir -p $GLAB_BACKUP_DIR

$GLAB_SILENT || echo -n "Fetching list of repositories ..."
GLAB_PROJ_API="${GLAB_API}/projects?private_token=${GLAB_TOKEN}&per_page=100&simple=true"
echo ${GLAB_PROJ_API}

REPOLIST=`check curl --silent ${GLAB_PROJ_API} | check perl -p -e "s/,/\n/g" | check grep "\"path_with_namespace\"" | check awk -F':"' '{print $2}' | check sed -e 's/"}//g'`

$GLAB_SILENT || echo "found `echo $REPOLIST | wc -w` repositories."

$GLAB_SILENT || (echo "" && echo "=== BACKING UP ===" && echo "")

for REPO in $REPOLIST; do
   REPO=${REPO%\"}
   $GLAB_SILENT || echo "Backing up ${REPO}"
   check ${GLAB_GIT_CLONE_CMD}${REPO}.git ${GLAB_BACKUP_DIR}/${GLAB_ORG}-${REPO}-${TSTAMP}.git && tgz ${GLAB_BACKUP_DIR}/${GLAB_ORG}-${REPO}-${TSTAMP}.git
done

if $GLAB_PRUNE_OLD; then
  $GLAB_SILENT || (echo "" && echo "=== PRUNING ===" && echo "")
  $GLAB_SILENT || echo "Pruning backup files ${GLAB_PRUNE_AFTER_N_DAYS} days old or older."
  $GLAB_SILENT || echo "Found `find $GLAB_BACKUP_DIR -name '*.tar.gz' -mtime +$GLAB_PRUNE_AFTER_N_DAYS | wc -l` files to prune."
  find $GLAB_BACKUP_DIR -name '*.tar.gz' -mtime +$GLAB_PRUNE_AFTER_N_DAYS -exec rm -fv {} > /dev/null \;
fi

$GLAB_SILENT || (echo "" && echo "=== DONE ===" && echo "")
$GLAB_SILENT || (echo "GitLab backup completed." && echo "")
新版gitlab安裝
https://xenby.com/b/131-%E6%8E%A8%E8%96%A6-gitlab%E5%AE%89%E8%A3%9D%E8%88%87%E5%9F%BA%E6%9C%AC%E8%A8%AD%E5%AE%9A%E6%95%99%E5%AD%B8
https://gitlab.com/gitlab-org/gitlab-ce/#installation
sudo nano /etc/gitlab/gitlab.rb
可以在裡面找到external_url
sudo gitlab-ctl reconfigure
https://gitlab.com/gitlab-org/gitlab-ce/#installation
sudo nano /etc/gitlab/gitlab.rb
可以在裡面找到external_url
sudo gitlab-ctl reconfigure
[轉]Bye bye Mongo, Hello Postgres
https://www.theguardian.com/info/2018/nov/30/bye-bye-mongo-hello-postgres
[轉]我花了一个五一终于搞懂了OpenLDAP
https://juejin.im/entry/5aec6ac46fb9a07ac3635884
如果你搜索OpenLDAP的安装指南,很不幸地告诉你,网上不管中文的英文的,90%都是错的,它们都还活在上个世纪,它们会告诉你要去修改一个叫做slapd.conf的文件,基本上看到这里,你就不用往下看了,这个文件早就被抛弃,新版的OpenLDAP里根本就没有这个文件!取而代之的是slapd.d的文件夹,然后另一部分教程会告诉你,让你修改这个文件夹下的某一个ldif文件,看到这里,你也不用往下看了,你又看到了伪教程,因为这个文件夹下的所有文件的第一行都明确地写着:『这是一个自动生成的文件,不要修改它!』你修改了它之后,它的md5校验值会匹配不上,造成更多的问题。你应该用ldapmodify来修改这个文件,而关于ldapmodify的教程,可以说几乎就没有!我一开始不知道面临这样荒谬的处境,很多运维人员是怎么活下来的,不过等我自己配通了以后,真的是累到连写教程的精力都没有了,好吧,我已经配通了,你们各人自求
如果你搜索OpenLDAP的安装指南,很不幸地告诉你,网上不管中文的英文的,90%都是错的,它们都还活在上个世纪,它们会告诉你要去修改一个叫做slapd.conf的文件,基本上看到这里,你就不用往下看了,这个文件早就被抛弃,新版的OpenLDAP里根本就没有这个文件!取而代之的是slapd.d的文件夹,然后另一部分教程会告诉你,让你修改这个文件夹下的某一个ldif文件,看到这里,你也不用往下看了,你又看到了伪教程,因为这个文件夹下的所有文件的第一行都明确地写着:『这是一个自动生成的文件,不要修改它!』你修改了它之后,它的md5校验值会匹配不上,造成更多的问题。你应该用ldapmodify来修改这个文件,而关于ldapmodify的教程,可以说几乎就没有!我一开始不知道面临这样荒谬的处境,很多运维人员是怎么活下来的,不过等我自己配通了以后,真的是累到连写教程的精力都没有了,好吧,我已经配通了,你们各人自求
[轉]Huge performance hit on a simple Go server with Docker
https://www.reddit.com/r/golang/comments/8ojjoj/huge_performance_hit_on_a_simple_go_server_with/
Docker's disk I/O was the bottleneck!
Solved: Disk I/O was the problem. Even though I'm on Debian 9.4, changing to an in-memory sqlite allowed Docker to push 2.9k reqs/sec. Credits to /u/Willson50 for the amazing find!
With file=dco.sqlite3?mode=memory, Docker can push ~2.9k req/sec.
Other way:
PRAGMA journal_mode=WAL;
PRAGMA synchronous=NORMAL;
https://www.sqlite.org/wal.html
https://www.sqlite.org/wal.html
ethereum poa docker-compose docker
https://medium.com/taipei-ethereum-meetup/%E4%BD%BF%E7%94%A8-go-ethereum-1-6-clique-poa-consensus-%E5%BB%BA%E7%AB%8B-private-chain-1-4d359f28feff
node 1
node 2
signer 1
signer 2
all private key & address create by https://vanity-eth.tk/
check again private key & address by https://www.myetherwallet.com/#view-wallet-info
private key:138cbbfb21686ddc3b5ffeb2cfc83491175af68319977acb81d0ae93392c626c
account address:e79d33e93bd888b35e055f1a12d876354729037b
node2
private key:df0c39faccd3c9d6d10091932f2214b9d42e92bd07b64a1552d13d39a6a84122
account address:Bf95EAacf10BEA53f0a73955a7eFCE2fb4A4Ef1d
signer1
nodekeyhex:fcc406a7344690f66c757cc2c9987e3e78bb01e33229f9877d48a7fecc2d6657
node address:256330933851d6d3c5f7326b01021553415a33cd5485e23bfbe35f6321e6e2f8373bb1c94933fdb3283a1a8b2b737587dd99c555029e65e173a3094daa39277c
private key:d05bd152f3d71ff5f91830f3ccc1090fb670c7026ebf8c2136d4e5090d59398d
account address:5921a4C1B13afbD4b61d63e9c7BD47741C47B176
signer2
private key:df504d175ae63abf209bad9dda965310d99559620550e74521a6798a41215f46
account address:8Cc5A1a0802DB41DB826C2FcB72423744338DcB0
docker-compose
version: '3.3'

services:
  go-ethereum-node1:
    build:
      context: go-ethereum-node1/
    volumes:
      #- ./go-ethereum/keystore:/root/.ethereum/devchain/keystore:rw
      - ./go-ethereum-node1/genesis/poa_for_dev.json:/root/genesis/poa_for_dev.json:ro
      - /etc/localtime:/etc/localtime:ro
      #- ./go-ethereum/log:/root/log:rw
    entrypoint: /root/start.sh
    ports:
      - "18545:8545"
      - "30313:30303"
      - "30313:30303/udp"
    networks:
      - fastdev

  go-ethereum-node2:
    build:
      context: go-ethereum-node2/
    volumes:
      - ./go-ethereum-node2/genesis/poa_for_dev.json:/root/genesis/poa_for_dev.json:ro
      - /etc/localtime:/etc/localtime:ro
    entrypoint: /root/start.sh
    ports:
      - "28545:8545"
      - "30323:30303"
      - "30323:30303/udp"
    networks:
      - fastdev

  go-ethereum-signer1:
    build:
      context: go-ethereum-signer1/
    volumes:
      - ./go-ethereum-signer1/genesis/poa_for_dev.json:/root/genesis/poa_for_dev.json:ro
      - /etc/localtime:/etc/localtime:ro
    entrypoint: /root/start.sh
    ports:
      - "38545:8545"
      - "30333:30303"
      - "30333:30303/udp"
    networks:
      - fastdev

  go-ethereum-signer2:
    build:
      context: go-ethereum-signer2/
    volumes:
      - ./go-ethereum-signer2/genesis/poa_for_dev.json:/root/genesis/poa_for_dev.json:ro
      - /etc/localtime:/etc/localtime:ro
    entrypoint: /root/start.sh
    ports:
      - "48545:8545"
      - "30343:30303"
      - "30343:30303/udp"
    networks:
      - fastdev

  mongo:
    image: mongo
    #restart: always
    environment:
      MONGO_INITDB_ROOT_USERNAME: root
      MONGO_INITDB_ROOT_PASSWORD: example
    volumes:
      - alldata:/data/db
    networks:
      - fastdev

  mongo-express:
    image: mongo-express
    #restart: always
    links:
      - mongo:mongo
    ports:
      - 8081:8081
    environment:
      ME_CONFIG_MONGODB_ADMINUSERNAME: root
      ME_CONFIG_MONGODB_ADMINPASSWORD: example
    networks:
      - fastdev

  postgres:
    image: postgres
    #restart: always
    environment:
      PGDATA: /var/lib/postgresql/data/pgdata
      POSTGRES_USER: root
      POSTGRES_PASSWORD: example
    volumes:
      - alldata:/var/lib/postgresql/data
    networks:
      - fastdev

  mariadb:
    image: mariadb
    #restart: always
    environment:
      MYSQL_ROOT_PASSWORD: example
    volumes:
      - alldata:/var/lib/mysql
    networks:
      - fastdev

  adminer:
    image: adminer
    #restart: always
    ports:
      - 8082:8080
    networks:
      - fastdev

  openldap:
    build:
      context: openldap/
    command: [--copy-service,  --loglevel, debug]
    environment:
      LDAP_ORGANISATION: "das-labor"
      LDAP_DOMAIN: "das-labor.org"
      LDAP_BASE_DN: "dc=das-labor,dc=org"
      LDAP_ADMIN_PASSWORD: "abc123"
      LDAP_CONFIG_PASSWORD: "abc123"
    volumes:
      - ./openldap/data/ldap/environment:/container/environment/01-custom
      - ./openldap/data/slapd/database:/var/lib/ldap
      - ./openldap/data/slapd/config:/etc/ldap/slapd.d
      #- ./openldap/certs:/container/service/slapd/assets/certs
    ports:
      - "389:389"
      - "689:689"
    networks:
      - fastdev

  phpldapadmin:
    image: osixia/phpldapadmin
    command: [--loglevel, debug]
    environment:
      PHPLDAPADMIN_LDAP_HOSTS: "openldap"
    ports:
      - "6443:443"
    networks:
      - fastdev

volumes:
  alldata:

networks:
  fastdev:
    driver: bridge
geth Dockerfile all same
FROM ethereum/client-go:alltools-latest

RUN \
    echo '@edge http://dl-cdn.alpinelinux.org/alpine/edge/main' >> /etc/apk/repositories && \
    echo '@edge http://dl-cdn.alpinelinux.org/alpine/edge/community' >> /etc/apk/repositories && \
    echo '@edge http://dl-cdn.alpinelinux.org/alpine/edge/testing' >> /etc/apk/repositories && \
    apk --no-cache upgrade

RUN apk update &&\
    apk add git nodejs bash perl

ADD ./genesis/poa_for_dev.json /root/genesis/poa_for_dev.json
#RUN geth init /root/genesis/genesis.json --datadir "~/.ethereum/devchain"


#RUN geth --dev --rpcapi "db,personal,eth,net,web3" --rpc --rpcaddr "0.0.0.0" --rpccorsdomain "*" --mine
#geth --syncmode "light" --cache=2048
#./geth --datadir /root/.ethereum --password /root/geth.password --unlock "0" --port 30310 --rpc --rpcaddr "0.0.0.0" -rpcapi "eth,web3" --rpcport 8110 --networkid 4567890 --dev --lightkdf --nodiscover --maxpeers 0 --verbosity 6 --pprof --pprofport 6110 $@ 2> /tmp/geth.log

COPY start.sh /root/start.sh
RUN chmod +x /root/start.sh

ENTRYPOINT /root/start.sh
genesis use puppeth see
https://medium.com/taipei-ethereum-meetup/%E4%BD%BF%E7%94%A8-go-ethereum-1-6-clique-poa-consensus-%E5%BB%BA%E7%AB%8B-private-chain-1-4d359f28feff
start.sh all different
node1
#!/bin/bash
set -e
datadir="~/.ethereum/devchain"
#ip=$(echo `awk 'END{print $1}' /etc/hosts`)
ip=$(ping -c1 go-ethereum-signer1 | sed -nE 's/^PING[^(]+\(([^)]+)\).*/\1/p')

echo "======== geth ========"
echo "======== init ========"
geth --datadir=$datadir init "/root/genesis/poa_for_dev.json"

sleep 2
echo "======== bootnode ========"
#bootkey="fcc406a7344690f66c757cc2c9987e3e78bb01e33229f9877d48a7fecc2d6657"
#bootnode -nodekeyhex $bootkey -verbosity 4 &
#bootnodeid=$(bootnode --nodekeyhex=$bootkey -writeaddress) #node address: 256330933851d6d3c5f7326b01021553415a33cd5485e23bfbe35f6321e6e2f8373bb1c94933fdb3283a1a8b2b737587dd99c555029e65e173a3094daa39277c

#bootnode --genkey=boot.key
#bootnode --nodekey=boot.key -verbosity 4 &
#bootnode --nodekey=boot.key  -writeaddress > bootnodeid.txt
#bootnodeid=$(bootnode --nodekey=boot.key  -writeaddress)

sleep 2
echo "======== account ========"
privatekey="138cbbfb21686ddc3b5ffeb2cfc83491175af68319977acb81d0ae93392c626c"
address="e79d33e93bd888b35e055f1a12d876354729037b"

echo "======== check account exist ========"
isInFile=$(echo `geth account list --datadir=$datadir | grep -c $address`)
if [ $isInFile -eq 0 ]; then
    echo "======== acoount no exist! Starting import! ========"
    echo "" > ~/.accountpassword
    echo $privatekey > ~/.privatekey
    geth account import --datadir=$datadir --password ~/.accountpassword  ~/.privatekey
else
   echo "======== account exist ========"
fi

sleep 2
echo "======== mine ========"
nodeaddress="256330933851d6d3c5f7326b01021553415a33cd5485e23bfbe35f6321e6e2f8373bb1c94933fdb3283a1a8b2b737587dd99c555029e65e173a3094daa39277c"

#no use bootnode, fix nodekeyhex
#geth --datadir=$datadir --nodekeyhex "fcc406a7344690f66c757cc2c9987e3e78bb01e33229f9877d48a7fecc2d6657" --networkid 53809 --port 30303 --rpcapi "db,admin,debug,miner,personal,txpool,eth,net,web3" --rpc --rpcaddr "0.0.0.0" --rpccorsdomain "*" --rpcvhosts=* --password ~/.accountpassword --unlock $address --mine --minerthreads=1  2> /root/geth.log

#use bootnode
bootnodeId="enode://"$nodeaddress"@"$ip":30303"
#bootnodeId="enode://"$bootnodeid"@"$ip":30303"
until echo | nc -z -v go-ethereum-signer1 30303; do
    echo "Waiting go-ethereum-signer1 to start..."
    sleep 2
done
geth --datadir=$datadir --bootnodes $bootnodeId --networkid 11559 --port 30303 --rpcapi "db,admin,debug,miner,personal,txpool,eth,net,web3" --rpc --rpcaddr "0.0.0.0" --rpccorsdomain "*" --rpcvhosts=* --password ~/.accountpassword --etherbase $address  2> /root/geth.log
node2
#!/bin/bash
set -e
datadir="~/.ethereum/devchain"
#ip=$(echo `awk 'END{print $1}' /etc/hosts`)
ip=$(ping -c1 go-ethereum-signer1 | sed -nE 's/^PING[^(]+\(([^)]+)\).*/\1/p')

echo "======== geth ========"
echo "======== init ========"
geth --datadir=$datadir init "/root/genesis/poa_for_dev.json"

sleep 2
echo "======== bootnode ========"
#bootkey="fcc406a7344690f66c757cc2c9987e3e78bb01e33229f9877d48a7fecc2d6657"
#bootnode -nodekeyhex $bootkey -verbosity 4 &
#bootnodeid=$(bootnode --nodekeyhex=$bootkey -writeaddress) #node address: 256330933851d6d3c5f7326b01021553415a33cd5485e23bfbe35f6321e6e2f8373bb1c94933fdb3283a1a8b2b737587dd99c555029e65e173a3094daa39277c

#bootnode --genkey=boot.key
#bootnode --nodekey=boot.key -verbosity 4 &
#bootnode --nodekey=boot.key  -writeaddress > bootnodeid.txt
#bootnodeid=$(bootnode --nodekey=boot.key  -writeaddress)

sleep 2
echo "======== account ========"
privatekey="df0c39faccd3c9d6d10091932f2214b9d42e92bd07b64a1552d13d39a6a84122"
address="bf95eaacf10bea53f0a73955a7efce2fb4a4ef1d"

echo "======== check account exist ========"
isInFile=$(echo `geth account list --datadir=$datadir | grep -c $address`)
if [ $isInFile -eq 0 ]; then
    echo "======== acoount no exist! Starting import! ========"
    echo "" > ~/.accountpassword
    echo $privatekey > ~/.privatekey
    geth account import --datadir=$datadir --password ~/.accountpassword  ~/.privatekey
else
   echo "======== account exist ========"
fi

sleep 2
echo "======== mine ========"
nodeaddress="256330933851d6d3c5f7326b01021553415a33cd5485e23bfbe35f6321e6e2f8373bb1c94933fdb3283a1a8b2b737587dd99c555029e65e173a3094daa39277c"

#no use bootnode, fix nodekeyhex
#geth --datadir=$datadir --nodekeyhex "fcc406a7344690f66c757cc2c9987e3e78bb01e33229f9877d48a7fecc2d6657" --networkid 53809 --port 30303 --rpcapi "db,admin,debug,miner,personal,txpool,eth,net,web3" --rpc --rpcaddr "0.0.0.0" --rpccorsdomain "*" --rpcvhosts=* --password ~/.accountpassword --unlock $address --mine --minerthreads=1  2> /root/geth.log

#use bootnode
bootnodeId="enode://"$nodeaddress"@"$ip":30303"
#bootnodeId="enode://"$bootnodeid"@"$ip":30303"
until echo | nc -z -v go-ethereum-signer1 30303; do
    echo "Waiting go-ethereum-signer1 to start..."
    sleep 2
done
geth --datadir=$datadir --bootnodes $bootnodeId --networkid 11559 --port 30303 --rpcapi "db,admin,debug,miner,personal,txpool,eth,net,web3" --rpc --rpcaddr "0.0.0.0" --rpccorsdomain "*" --rpcvhosts=* --password ~/.accountpassword --etherbase $address  2> /root/geth.log
signer1
#!/bin/bash
set -e
datadir="~/.ethereum/devchain"
ip=$(echo `awk 'END{print $1}' /etc/hosts`)
#ip=$(ping -c1 go-ethereum-signer1 | sed -nE 's/^PING[^(]+\(([^)]+)\).*/\1/p')

echo "======== geth ========"
echo "======== init ========"
geth --datadir=$datadir init "/root/genesis/poa_for_dev.json"

sleep 2
echo "======== bootnode ========"
#bootkey="fcc406a7344690f66c757cc2c9987e3e78bb01e33229f9877d48a7fecc2d6657"
#bootnode -nodekeyhex $bootkey -verbosity 4 &
#bootnodeid=$(bootnode --nodekeyhex=$bootkey -writeaddress) #node address: 256330933851d6d3c5f7326b01021553415a33cd5485e23bfbe35f6321e6e2f8373bb1c94933fdb3283a1a8b2b737587dd99c555029e65e173a3094daa39277c

#bootnode --genkey=boot.key
#bootnode --nodekey=boot.key -verbosity 4 &
#bootnode --nodekey=boot.key  -writeaddress > bootnodeid.txt
#bootnodeid=$(bootnode --nodekey=boot.key  -writeaddress)

sleep 2
echo "======== account ========"
privatekey="d05bd152f3d71ff5f91830f3ccc1090fb670c7026ebf8c2136d4e5090d59398d"
address="5921a4c1b13afbd4b61d63e9c7bd47741c47b176"

echo "======== check account exist ========"
isInFile=$(echo `geth account list --datadir=$datadir | grep -c $address`)
if [ $isInFile -eq 0 ]; then
    echo "======== acoount no exist! Starting import! ========"
    echo "" > ~/.accountpassword
    echo $privatekey > ~/.privatekey
    geth account import --datadir=$datadir --password ~/.accountpassword  ~/.privatekey
else
   echo "======== account exist ========"
fi

sleep 2
echo "======== mine ========"
#nodeaddress="256330933851d6d3c5f7326b01021553415a33cd5485e23bfbe35f6321e6e2f8373bb1c94933fdb3283a1a8b2b737587dd99c555029e65e173a3094daa39277c"

#no use bootnode, fix nodekeyhex
geth --datadir=$datadir --nodekeyhex "fcc406a7344690f66c757cc2c9987e3e78bb01e33229f9877d48a7fecc2d6657" --networkid 11559 --port 30303 --rpcapi "db,admin,debug,miner,personal,txpool,eth,net,web3" --rpc --rpcaddr "0.0.0.0" --rpccorsdomain "*" --rpcvhosts=* --password ~/.accountpassword --unlock $address --mine --minerthreads=1  2> /root/geth.log

#use bootnode
#bootnodeId="enode://"$nodeaddress"@"$ip":30303"
#bootnodeId="enode://"$bootnodeid"@"$ip":30303"
#until echo | nc -z -v go-ethereum-signer1 30303; do
#    echo "Waiting go-ethereum-signer1 to start..."
#    sleep 2
#done
#geth --datadir=$datadir --bootnodes $bootnodeId --networkid 11559 --port 30303 --rpcapi "db,admin,debug,miner,personal,txpool,eth,net,web3" --rpc --rpcaddr "0.0.0.0" --rpccorsdomain "*" --rpcvhosts=* --password ~/.accountpassword --etherbase $address  2> /root/geth.log
signer2
#!/bin/bash
set -e
datadir="~/.ethereum/devchain"
#ip=$(echo `awk 'END{print $1}' /etc/hosts`)
ip=$(ping -c1 go-ethereum-signer1 | sed -nE 's/^PING[^(]+\(([^)]+)\).*/\1/p')

echo "======== geth ========"
echo "======== init ========"
geth --datadir=$datadir init "/root/genesis/poa_for_dev.json"

sleep 2
echo "======== bootnode ========"
#bootkey="fcc406a7344690f66c757cc2c9987e3e78bb01e33229f9877d48a7fecc2d6657"
#bootnode -nodekeyhex $bootkey -verbosity 4 &
#bootnodeid=$(bootnode --nodekeyhex=$bootkey -writeaddress) #node address: 256330933851d6d3c5f7326b01021553415a33cd5485e23bfbe35f6321e6e2f8373bb1c94933fdb3283a1a8b2b737587dd99c555029e65e173a3094daa39277c

#bootnode --genkey=boot.key
#bootnode --nodekey=boot.key -verbosity 4 &
#bootnode --nodekey=boot.key  -writeaddress > bootnodeid.txt
#bootnodeid=$(bootnode --nodekey=boot.key  -writeaddress)

sleep 2
echo "======== account ========"
privatekey="df504d175ae63abf209bad9dda965310d99559620550e74521a6798a41215f46"
address="8cc5a1a0802db41db826c2fcb72423744338dcb0"

echo "======== check account exist ========"
isInFile=$(echo `geth account list --datadir=$datadir | grep -c $address`)
if [ $isInFile -eq 0 ]; then
    echo "======== acoount no exist! Starting import! ========"
    echo "" > ~/.accountpassword
    echo $privatekey > ~/.privatekey
    geth account import --datadir=$datadir --password ~/.accountpassword  ~/.privatekey
else
   echo "======== account exist ========"
fi


sleep 2
echo "======== mine ========"
nodeaddress="256330933851d6d3c5f7326b01021553415a33cd5485e23bfbe35f6321e6e2f8373bb1c94933fdb3283a1a8b2b737587dd99c555029e65e173a3094daa39277c"

#no use bootnode, fix nodekeyhex
bootnodeId="enode://"$nodeaddress"@"$ip":30303"
until echo | nc -z -v go-ethereum-signer1 30303; do
    echo "Waiting go-ethereum-signer1 to start..."
    sleep 2
done
geth --datadir=$datadir --bootnodes $bootnodeId --networkid 11559 --port 30303 --rpcapi "db,admin,debug,miner,personal,txpool,eth,net,web3" --rpc --rpcaddr "0.0.0.0" --rpccorsdomain "*" --rpcvhosts=* --password ~/.accountpassword --unlock $address --mine --minerthreads=1  2> /root/geth.log

#use bootnode
#bootnodeId="enode://"$nodeaddress"@"$ip":30303"
#bootnodeId="enode://"$bootnodeid"@"$ip":30303"
#until echo | nc -z -v go-ethereum-signer1 30303; do
#    echo "Waiting go-ethereum-signer1 to start..."
#    sleep 2
#done
#geth --datadir=$datadir --bootnodes $bootnodeId --networkid 11559 --port 30303 --rpcapi "db,admin,debug,miner,personal,txpool,eth,net,web3" --rpc --rpcaddr "0.0.0.0" --rpccorsdomain "*" --rpcvhosts=* --password ~/.accountpassword --etherbase $address  2> /root/geth.log
Best Important is
1. private key & address must right.
2. signer1 must start, so node1 node2 signer2 wait signer1
3. start.sh file must utf-8 & LE
4. docker inside port different outside port(expose port)
Final check:
login docker signer1
docker ps -a |grep signer1    Get docker signer1 id
docker exec -it xxxid /bin/bash
into docker
>find / -name geth.ipc     Get geth.ipc path
>get attach ipc:/xxxx/xxxxx/xxxxx/xxxxx/geth.ipc
into geth console
>admin.peers    Can see three node (node1 node2 signer2)
>personal.listWallets   Check unlock
>eth.mining   Check true (mining start mining)
PS:keep bootnode code for if you want wake up bootnode and not use signer1 be connect. This can make code more easy and smae, only some key word ( private key, address..etc) different.
PS:If create finish, change volumn path that maybe get “can't find .accountpassword “. fix way:just add again at account exist
echo "" > ~/.accountpassword
full demo like this
else
   echo "======== account exist ========"
   echo "" > ~/.accountpassword
fi
Flutter ionic framwork7
有寫一支離線APP(不需要網路),app有上架android和ios,andorid有開廣告,而ios賣出去一些。
一開始開發使用framework 7 (純javascrip、html、css),開發速度是最快的,照著官網教學做,顏色不大改、版型照用,真的很快,然後用codova包一包,就上架了,操作起來也順,介面看起來都很像ios,唯一的問題是要花時間了解fromework 7架構上,第一次使用當然很痛苦,痛點在於framework,優點在於 html、css、javascript自由。
整體開發時程:一周內肯定解決。
後來改版了,花一些時間了解ionic,發現ionic跟Framework7用法差不多,但卻可以使用ionic native跟底層溝通(不過實際上這支APP根本不用到native),硬生生加入一個底層開啟圖片的功能;ionic開發起來也是很快,因為還是html為主的方式,另外也有花時間了解react,和react不同是,一開始的jsx就一堆問題,不過這是在很早期react會發生的問題(現在已經沒有這些問題);除react外,Angular也同樣有花時間了解,那時 Angular 1 基本上也是放棄,因為太複雜、反人類… Angular 2在寶哥展示後,發現“真的“不反人類了,就決定可以用ionic;ionic開發快在Angular 2+的底層架構,實際開發中的痛苦點反而比Framework7少,畢竟有Framework7可以對照開發,只需要進行語法上的轉換,不用花心思在架構上,Angular也是可以用javascript,Framework7上的array、object可以直接照搬來使用,唯一花時間在 上廣告 和 圖片呼叫底層,有痛到。
一周內肯定解決。
ionic 2 -> ionic 3 ,基本上 印象中 1天內解決吧,處理一些不相容問題而已。
ionic 2或3 順暢度,覺得差不多,唯一碰到的是原生的元件,在中文顯示小標題時,有一點被裁到,這問題在網頁上看時是正常的,在app上看時是不正常,這令人很困擾,但也懶得再用css調整了,就是這問題成為往flutter開發前進的關鍵原因。
Flutter官方展示對我最重要的點:修改後即時更新顯示 和 Material的元件。
改版撰寫時期發現 即時更新顯示 正常情況下是沒問題,但會有失效的情況,最終還是要重新complie app,但這功能只要運作正常時,是非常好用,可以慢慢調整畫面,真的太好用了!
之前開發都是跟web相關,即使在web broswer看是正常的,套入app後還是要把所有的情況再點擊測試一次(會有網頁正常、APP不正常情況),撰寫過程中發現問題進行修正後,需要再度complie app,然後再執行再調整,重覆web模式,和原生android開發也差不多,app每次complie完再操作,再調整,再重來一次complie執行…一直循環
能即時更新這點……真的節省非常多的時間!
但!!! 這次使flutter開發卻是有始以來花費時間最久的,Dart…Flutter Framework,Widget.......開發總時間已經逼進三星期以上,現在也只不過開發80%而己。
1、圖片 要能兩指縮放,最終網上有大神有做出plug,但為了套到去,就花了一星期以上,先參考官方demo app,移值失敗,用大神才成功。好處:終於離開底層的縮放,也不是css或javascript假縮放。
2、搜尋 看了一堆demo後,官方有比較推的方式,照做,照完後,發現是有BUG的,可能官網的做法,最後的搜尋完的點選,是在同一頁,但實際肯定會nav push到新頁,回到搜尋頁後,就不能搜尋了,debug查了整整一天,試了各種方式後,放棄! 改找網路上土砲法,自己做搜尋在header,然後再參考官方控制操作,這樣終於改完了。這也是一周以上的時間。
3、文章式的顯示:多塊區域組合,這裡也是花一堆時間,ListView怎麼處理widget [] 和chrild、chrildren等等,這裡正式踢鐵版,卻更了解上述一些架構上的問題。
改版到這裡就花了三星期以上的時間,這樣開發不是一次三星期,而是下班後斷斷續續的開發,到現在還是沒開發完畢,以之前的開發經驗,接下來肯定有
1、admob
2、androdi ios 實際創建app問題 android應該最少,ios最多
真的開發的話,有時間壓力的話,ionic還是最快的,但為了app畫面精緻度,也許Flutter………
ethereum-etl ethereumetl elk logstash kibana
all output columns with logstash
filter {
  if [srctype] == "etl" { #[fields][srctype]
    csv {
      columns => [
        "number", "hash",  "parent_hash",  "nonce",  "sha3_uncles",  "logs_bloom",  "transactions_root",
        "state_root",  "receipts_root",  "timestamp",  "extra_data",  "transaction_count",  "gas_limit",
        "size",  "total_difficulty",  "difficulty",  "miner",  "block_hash",  "block_number",
        "transaction_index",  "from_address",  "to_address",  "value",  "gas",  "gas_price",  "input",
        "address",  "bytecode",  "function_sighashes",  "is_erc20",  "is_erc721",  "log_index",
        "transaction_hash",  "data",  "topics",  "cumulative_gas_used",  "gas_used",  "contract_address",
        "root,status"
      ]
      separator => ","
      remove_field => ["message"]
      #autodetect_column_names => true   #have problems
      #autogenerate_column_names => true #have problems
      skip_empty_columns => true
      skip_empty_rows => true
    }
  }
logstash fileds if
https://sueboy.blogspot.com/2018/11/elk60filebeatdocumenttype.html
filebeat.yml
- type: log
  paths:
    - /var/log/geth.log
  exclude_files: ['.gz$']

  fields:
    srctype: "geth"
pipleline logstah.conf
if [fields][srctype] == "geth" {
BUT fields_under_root: true
- type: log
  paths:
    - /var/log/geth.log
  exclude_files: ['.gz$']

  fields:
    srctype: "geth"
  fields_under_root: true
if [srctype] == "geth" {
ethereum-etl ethereumetl docker
docker-compose.yml
version: '3.3'

services:
  ethereum_etl:
    build:
      context: .
    volumes:
      - ./var/log/:/ethereum-etl/output:rw
      #- /root/go/src/github.com/ethereum/go-ethereum/build/bin/data:/ethereum-etl/ipc #failed ipc is interface not data
    networks:
      - etl

networks:
  etl:
    driver: bridge
DOCKERFILE
FROM python:3.6-alpine
MAINTAINER Eric Lim
ENV PROJECT_DIR=ethereum-etl

RUN mkdir /$PROJECT_DIR
WORKDIR /$PROJECT_DIR
RUN apk add --no-cache gcc musl-dev  #for C libraries:
RUN pip install --upgrade pip && pip install ethereum-etl

#ENTRYPOINT ["python", "ethereumetl"]
ENTRYPOINT ["ethereumetl"]
CMD ["export_all", "-s", "0", "-e", "500000", "-p", "http://xxx.xxx.xxx.xxx:8545", "-o", "output"]
-s -e -p -o see
https://github.com/blockchain-etl/ethereum-etl
Import:-p must give port. http 80, https 443 so custom geth port usually 8545
--rpcaddr "0.0.0.0" or special ip
geth --datadir ./gethdata --networkid xxxxxx --rpcapi "db,eth,net,web3,personal" --rpc --rpccorsdomain "*" --rpcaddr "0.0.0.0" --port 30303 console
[轉]只要fed還敢升息,你和我說經濟數據有多差,景氣有多壞,整體公司獲利不好…等,你打死我,我都不相信
https://www.mobile01.com/topicdetail.php?f=291&t=5107288&p=1079#10788
市場預期下星期三fed會再升息一次,利率範圍來到2.25% 至 2.5%,當初我說過,升息會提高投資的成本,但每一個人承擔利率的容忍度不同,所以每一次fed預期升息或是fed確定升息,都會有部份的資金從股市中撤出,市場預期這件事,所以短線的賣盤比買盤少,所以股價就會下跌,比較壞的主力或法人明知你有不得不撤出的壓力,就故意把股價壓的低低的向你買,當這些因fed升息的賣壓宣洩完後,股價會漲回去,但我說過,股價是由資金所堆出來的,市場上的資金減少,總體上指數一定會向下修正,投資人就會去嚴格審視個股,資金往較高殖利率的地方移動,往相對便宜的個股移動,往防守性的個股移動…等。
若以陰謀論來看美股,有可能是華爾街故意讓股市下跌,以股市去逼fed不要再升息,最好是這一次不要升,如果不行,下一次最好不要升,每次的升息,代表投資成本的增加,企業財務成本的增加,這對股價及公司獲利都會直接或間接的影響。大家應該如果看待fed升息或貿易戰對股市帶來的下修,我個人認為,如果你的資金不是幾億,幾十億,幾百億,你應該要樂觀的看待股市景氣偱環,樂觀的看待下一次財富重分配的機會,但我說過,股市下修的過程,你不會知道什麼是最低點,什麼是最高點,這時你只有小量的參與股市,你才會知道股市目前走到什麼地步,股市會不會修正?以及會修正到哪?這要視貿易戰最終的結果,我說過,fed升息是要讓景氣軟著陸,避免景氣過熱,泡泡吹的太大顆,讓景氣維持一定的水準前進,而惡化的貿易戰是讓景氣硬著陸,一口氣把景氣打到底,崩的速度快而且狠。
當初我說過,只要fed還敢升息,你和我說經濟數據有多差,景氣有多壞,整體公司獲利不好…等,你打死我,我都不相信,fed手上的經濟數據有多厚,他們是國家最高的資訊收集中心,收集到的資訊都是相對正確的,哪個分析師,哪個天神有他們資訊多,一旦fed不敢再升息,會放慢升息,這代表貿易戰的影響已經開始影響到經濟數據,這時也不需要過度緊張,中美貿易戰還在談,如果買到的點在價值區,在波動中你想要賣或抱都不會造成你太大的傷害,因為沒有人能預期什麼是最低點,所以最科學的方法就是在價值區你要小量佈局且持有,等待所謂的更低點或最低點時,你不至於會錯過相對值得買的價值區,而且你每持有一年,你都能得到公司配出來的股息,進而降低你的投資成本,降低你的投資風險。
所以股市漲上去或跌下去,對你來說你都有策略,漲的時候你手上有2成3左右的股票,買在10年線下,未來這筆投資長線你會得到不錯的報酬,如果貿易戰惡化,股市持續修正,股價跌到價值區打九折,打八折,打七折,打五折,你需要擔心嗎?當然不需要擔心,這些打九折,打八折,打七折甚至打五折的股票,這會成為你未來得到暴利的投資,重點是真的跌到那個點時,你手上要有資金能買進,這也是我常說資金配置的重要性。
也許你今年買在亞泥十年線2成3,一年後領了股息後,亞泥股價減了2點8元,那時股市修正到8800點,其實我們在9500點買進,扣到明年的除權息400~500點後6,說不定才損失200點,一般新手覺得跌了700點好值得買,其實僅是跌了200點,但有跌的機會就會有漲的機會,如果股價一直撐在3~5年線之間,每一年手上有股票的人,成本就愈來愈低,完全空手的人就一直在場外說,快崩盤了,快崩盤了,十年後,真的跌到6000點,其實十年前持有的人也都還是賺50%以上。
[轉]Install Python version 3 side by side with version 2 in Centos 7
https://stackoverflow.com/questions/45997541/install-python-version-3-side-by-side-with-version-2-in-centos-7
yum -y install https://centos7.iuscommunity.org/ius-release.rpm
yum -y install python36u
yum -y install python36u-pip
pip3.6 install numpy
yum -y install https://centos7.iuscommunity.org/ius-release.rpm
yum -y install python36u
yum -y install python36u-pip
pip3.6 install numpy
[轉 fb]ssd ceph

你這顆的 DWPD 只有 0.3, 每天只能寫入 37GB 的資料, 很快就會爆了....Ceph 如果維運技術不夠好的話, 有時會不小心觸發 PG 移動, 每次移動 PG 就是上百 GB 的資料在寫入....
給 Ceph 用的 SSD, 建議 DWPD 至少要 3 起跳, 最好是 10...
flutter dart Map
Map<String, dynamic> all = <String, dynamic>{
'n1': {'name': '大豆', 'img': 'c11_list_img'},
'n2': {'name': '纖維', 'img': 'c12_list_img.jpg'},
'n3': {'name': '天然蔬果', 'img': 'c13_list_img.jpg'},
};
'n1': {'name': '大豆', 'img': 'c11_list_img'},
'n2': {'name': '纖維', 'img': 'c12_list_img.jpg'},
'n3': {'name': '天然蔬果', 'img': 'c13_list_img.jpg'},
};
Gallium os ubuntu OpenFortiGUI OpenFortiGUI-runner
Install two part:
OpenFortiGUI
OpenFortiGUI-runner
Port set maybe:
443
8443
10443
OpenFortiGUI
OpenFortiGUI-runner
Port set maybe:
443
8443
10443
flutter SearchDelegate have bug
showSearch(context: context, delegate: DataSearch());
When you click item to other page, this is mean use listView & listTitle
onTap: () {
Navigator.push(
context,
new MaterialPageRoute(
builder: (BuildContext context) => new PcPage(item),
)
);
},
When you click item to other page, this is mean use listView & listTitle
onTap: () {
Navigator.push(
context,
new MaterialPageRoute(
builder: (BuildContext context) => new PcPage(item),
)
);
},
Then back to SearchDelegate
Search bar can input !
Demo No problem because only change buildResults. So show on same page is OK.
But usually show to other details page.
kibana geo_point How to Part 5
Oragin
  geoip {
    source => "filebeatserverip"
    target => "filebeatserveripgeoip"
    add_field => [ "[filebeatserveripgeoip][coordinates]", "%{[filebeatserveripgeoip][longitude]}" ]
    add_field => [ "[filebeatserveripgeoip][coordinates]", "%{[filebeatserveripgeoip][latitude]}" ]
  }

  mutate {
    convert => ["[filebeatserveripgeoip][coordinates]", "float"]
  }
Delete
add_field => [ "[filebeatserveripgeoip][coordinates]", "%{[filebeatserveripgeoip][longitude]}" ]
add_field => [ "[filebeatserveripgeoip][coordinates]", "%{[filebeatserveripgeoip][latitude]}" ]
convert => ["[filebeatserveripgeoip][coordinates]", "float"]
  geoip {
    source => "filebeatserverip"
    target => "filebeatserveripgeoip"
  }

  mutate {
  }
=====
{
  "index_patterns": ["filebeat*", "heartbeat*"],
  "settings": {
    "number_of_shards": 1
  },
  "mappings": {
    "doc": {
      "properties": {
        "filebeatserveripgeoip.coordinates": {
          "type": "geo_point"
        }
      }
    }
  }

}
Change filebeatserveripgeoip.coordinates -> filebeatserveripgeoip.location
{
  "index_patterns": ["filebeat*", "heartbeat*"],
  "settings": {
    "number_of_shards": 1
  },
  "mappings": {
    "doc": {
      "properties": {
        "filebeatserveripgeoip.location": {
          "type": "geo_point"
        }
      }
    }
  }

}
template_filebeat.json
curl -v -XPUT elasticsearch:9200/_template/template_filebeat -H 'Content-Type: application/json' -d @/usr/share/config/template_filebeat.json
curl -v -XPUT elasticsearch:9200/_template/template_filebeat -H 'Content-Type: application/json' -d'
{
  "index_patterns": ["filebeat*", "heartbeat*"],
  "settings": {
    "number_of_shards": 1
  },
  "mappings": {
    "doc": {
      "properties": {
        "filebeatserveripgeoip.location": {
          "type": "geo_point"
        }
      }
    }
  }

}'
location be created by geoip plugin.
MAX Import
GET _cat/indices?v
GET _cat/indices?v&s=index
GET filebeat-6.5.1-2018.12.06
DELETE filebeat-6.5.1-2018.12.06
GET _cat/indices?v
GET filebeat-6.5.1-2018.12.06
AND
refresh chrome (brwoser)
geth log No Year
geth log mined
INFO [12-07|13:04:44] 🔨 mined potential block number=1934700 hash=3f9161…88da7d
only month-day .......
Recreate index
GET _cat/indices?v
GET _cat/indices?v&s=index
GET filebeat-6.5.1-2018.12.06
DELETE filebeat-6.5.1-2018.12.06
GET _cat/indices?v
GET filebeat-6.5.1-2018.12.06
If index rebuild, Kibana DISCOVER table will be see.
INFO [12-07|13:04:44] 🔨 mined potential block number=1934700 hash=3f9161…88da7d
only month-day .......
  grok {
    match => ["message", "%{LOGLEVEL:logType} \[%{DATA:gethmm}-%{DATA:gethdd}\|%{DATA:gethtime}\] %{GREEDYDATA:tmessage} number=(?\b\w+\b) hash=(?\b\w+...\w+\b)"]
    add_field => ["gethdate", "%{[gethmm]}-%{[gethdd]} %{[gethtime]}"]
  }

  ruby {
    code =>
      " tstamp = event.get('@timestamp').to_i
        event.set('epoch',tstamp)
        event.set('gethdate', Time.at(tstamp).strftime('%Y')+'-'+event.get('gethdate'))
      "
  }

  date {
    match => [ "gethdate" , "YYYY-MM-dd HH:mm:ss"]
    target => "gethdate"
    timezone => "Asia/Taipei"
  }
Recreate index
GET _cat/indices?v
GET _cat/indices?v&s=index
GET filebeat-6.5.1-2018.12.06
DELETE filebeat-6.5.1-2018.12.06
GET _cat/indices?v
GET filebeat-6.5.1-2018.12.06
If index rebuild, Kibana DISCOVER table will be see.
Kibana export index-pattern visualization import
Export
index-pattern
curl http://xxx.xxx.xxx.xxx:5601/api/saved_objects/index-pattern/f1836c20-e880-11e8-8d66-7d7b4c3a5906 > index-pattern-export.json
visualization
curl http://xxx.xxx.xxx.xxx:5601/api/saved_objects/visualization/1eb85311-f901-11e8-864c-bd4880954537 > visual-export.json
Import
index-pattern
curl -v -XPOST kibana:5601/api/kibana/dashboards/import?force=true -H "kbn-xsrf:true" -H "Content-type:application/json" -d @/usr/share/config/config/index-pattern-export.json
visualization
curl -v -XPOST kibana:5601/api/kibana/dashboards/import?force=true -H "kbn-xsrf:true" -H "Content-type:application/json" -d @/usr/share/config/config/visual-export.json
PS:
visualization can be multi
index-pattern
curl http://xxx.xxx.xxx.xxx:5601/api/saved_objects/index-pattern/f1836c20-e880-11e8-8d66-7d7b4c3a5906 > index-pattern-export.json
visualization
curl http://xxx.xxx.xxx.xxx:5601/api/saved_objects/visualization/1eb85311-f901-11e8-864c-bd4880954537 > visual-export.json
Import
index-pattern
curl -v -XPOST kibana:5601/api/kibana/dashboards/import?force=true -H "kbn-xsrf:true" -H "Content-type:application/json" -d @/usr/share/config/config/index-pattern-export.json
visualization
curl -v -XPOST kibana:5601/api/kibana/dashboards/import?force=true -H "kbn-xsrf:true" -H "Content-type:application/json" -d @/usr/share/config/config/visual-export.json
PS:
visualization can be multi
{
"objects": [
{"id":"0c298010-f901-11e8-864c-bd4880954537",...},
{"id":"1eb85300-f901-11e8-864c-bd4880954537",...}
]}
kibana geo_point How to Part 4
1. Change logstash add fields or grok some fields. Kibana DISCOVER Table can see new fields & !
2. Kibana Management -> Index Patterns can "Fefresh field list" ! will be disappear.
3. Logstash set some fields Type "geo_point". see Kibana DISCOVER Table field Type still "TEXT". Try to delete index.
GET _cat/indices?v
GET _cat/indices?v&s=index
GET filebeat-6.5.1-2018.12.06
DELETE filebeat-6.5.1-2018.12.06
After DELETE index (real index), index rebuiled. Geo_point usually can see.
4. Every things sure is ok, export index-pattern.json
https://sueboy.blogspot.com/2018/11/kibana-default-index-pattern.html
==========
Mutil geo_ip
logstash
filebeatserverip:filebeat server ip
/etc/filebeat.yml
xxx.xxx.xxx.xxx put server ip, then logstash can get "filebeatserverip" field
filebeatserveripgeoip: usually demo is geoip. Some log have src_ip dest_ip client_ip...etc
template_filebeat (template_filebeat.json)
send template_filebeat.json to elasticseart
curl -v -XPUT elasticsearch:9200/_template/template_filebeat -H 'Content-Type: application/json' -d @/usr/share/config/template_filebeat.json
Then
GET _cat/indices?v
GET filebeat-6.5.1-2018.12.06
DELETE filebeat-6.5.1-2018.12.06
GET _cat/indices?v
GET filebeat-6.5.1-2018.12.06
If index rebuild, Kibana DISCOVER table will be see.
2. Kibana Management -> Index Patterns can "Fefresh field list" ! will be disappear.
3. Logstash set some fields Type "geo_point". see Kibana DISCOVER Table field Type still "TEXT". Try to delete index.
GET _cat/indices?v
GET _cat/indices?v&s=index
GET filebeat-6.5.1-2018.12.06
DELETE filebeat-6.5.1-2018.12.06
After DELETE index (real index), index rebuiled. Geo_point usually can see.
4. Every things sure is ok, export index-pattern.json
https://sueboy.blogspot.com/2018/11/kibana-default-index-pattern.html
==========
Mutil geo_ip
logstash
  geoip {
    source => "filebeatserverip"
    target => "filebeatserveripgeoip"
    add_field => [ "[filebeatserveripgeoip][coordinates]", "%{[filebeatserveripgeoip][longitude]}" ]
    add_field => [ "[filebeatserveripgeoip][coordinates]", "%{[filebeatserveripgeoip][latitude]}" ]
  }

  mutate {
    convert => ["[filebeatserveripgeoip][coordinates]", "float"]
  }
filebeatserverip:filebeat server ip
/etc/filebeat.yml
- type: log
  paths:
    - /var/log/*.log
  exclude_files: ['.gz$']
  tags: ["xxx.xxx.xxx.xxx"]
  fields:
    filebeatserverip: "xxx.xxx.xxx.xxx"
  fields_under_root: true
xxx.xxx.xxx.xxx put server ip, then logstash can get "filebeatserverip" field
filebeatserveripgeoip: usually demo is geoip. Some log have src_ip dest_ip client_ip...etc
template_filebeat (template_filebeat.json)
{
  "index_patterns": ["filebeat*", "heartbeat*"],
  "settings": {
    "number_of_shards": 1
  },
  "mappings": {
    "doc": {
      "properties": {
        "geoip.location": {
          "type": "geo_point"
        },
        "geoip.coordinates": {
          "type": "geo_point"
        },
        "filebeatserveripgeoip.coordinates": {
          "type": "geo_point"
        }
      }
    }
  }

}
send template_filebeat.json to elasticseart
curl -v -XPUT elasticsearch:9200/_template/template_filebeat -H 'Content-Type: application/json' -d @/usr/share/config/template_filebeat.json
Then
GET _cat/indices?v
GET filebeat-6.5.1-2018.12.06
DELETE filebeat-6.5.1-2018.12.06
GET _cat/indices?v
GET filebeat-6.5.1-2018.12.06
If index rebuild, Kibana DISCOVER table will be see.
google spf
https://support.google.com/a/answer/60764
nslookup -q=TXT _spf.google.com 8.8.8.8
nslookup -q=TXT _netblocks.google.com 8.8.8.8
nslookup -q=TXT _netblocks2.google.com 8.8.8.8
nslookup -q=TXT _netblocks3.google.com 8.8.8.8
35.190.247.0/24
64.233.160.0/19
66.102.0.0/20
66.249.80.0/20
72.14.192.0/18
74.125.0.0/16
108.177.8.0/21
173.194.0.0/16
209.85.128.0/17
216.58.192.0/19
216.239.32.0/19
172.217.0.0/19
172.217.32.0/20
172.217.128.0/19
172.217.160.0/20
172.217.192.0/19
108.177.96.0/19
35.191.0.0/16
130.211.0.0/22
2001:4860:4000::/36
2404:6800:4000::/36
2607:f8b0:4000::/36
2800:3f0:4000::/36
2a00:1450:4000::/36
2c0f:fb50:4000::/36
[轉] DARPA 八問 Dr. George Heilmeier
1. 你想做什麼?用一般人看得懂的語言,清晰表述你的目標,而非用行業術語。
What are you trying to do? Articulate your objectives using absolutely no jargon.
2. 現狀如何?現行做法的侷限是什麼?為什麼是現在要做?
How is it done today, and what are the limits of current practice?
How is it done today, and what are the limits of current practice?
3. 為什麼是你?你的研究有什麼不同之處,你相信它能成功的理由是什麼?
What is new in your approach and why do you think it will be successful?
What is new in your approach and why do you think it will be successful?
4. 誰會受益?如果你成功了,會帶來什麼改變?
Who cares? If you are successful, what difference will it make?
Who cares? If you are successful, what difference will it make?
5. 風險有哪些?效益又有哪些?
What are the risks and payoffs?
What are the risks and payoffs?
6. 成本是多少?
How much will it cost?
How much will it cost?
7. 要多久才會成功?
How long will it take?
How long will it take?
8. 期中和期末要如何檢驗,才能判斷是否成功?
What are the mid-term and final 「exams」 to check for success?
What are the mid-term and final 「exams」 to check for success?
貿易戰 亞泥
https://www.mobile01.com/topicdetail.php?f=291&t=5107288&p=1059#10590
目前礙於已簽署的500億美金25%,1000億美金的10%,加上預計2019/1/1的2000億要提高到25%,已知的條件就是相對的不利,如果談判沒有結果,這些已經簽的關稅是不會取消的,就算有結果,應該是先口頭上的和談,這些關稅慢慢的才會拿掉,這些事我們幾星期前就都想清楚了,所以一成五的資金我就不會再多放了,我認為目前台股個股的股價算是在價值區,價格算是可口,買了放中長線會失敗的機率不太大,當初說過,如果和談後,可以再買進一些,當關稅逐一拿掉時,把資金逐漸加上5成,如果和談失敗,一成五要賣我個人不反對,要留也是可以,要留就是利用資金配置,透過時間視企業被影響的程度去加碼,目前水泥的價格,在第四季,明年第一季的獲利我想也不會太差,今年亞泥也許能賺到近4元,台泥能賺4.X元,撐到明年中除息時,亞泥也許就配回2.5~3元,台泥也許配2.8~3.2元,那時時間都來到明年下半年了,那時貿影戰對企業獲利的影響大概都表現出來了,那時再買進對於中長期也不會賠,長期也是甜美的價位。
佈局大量的資金時,一定是以"平均價位",不要妄想,大盤最低5000點,你就想ALL IN在5000點,在下跌的過程中,你不會知道9000點是不是最低,8000點是不是最低,7000點是不是最低,6000點是不是晚低,5000點是不是最低,4000點是不是最低,在不景氣時,企業還是會獲利,會配息的,當公司股價在價值區,買到後,未來股價會回到價值區一點都不困難,重點是在等待的同時你還是有股息可以領,這和一般外資群的做法是一模一樣的,你看外資群持有15X萬張的台泥,7X萬張的亞泥,不論中美貿易戰是否持續,外資群不會出清台泥及亞泥的,了不起就是調節一些為了要打敗大盤績效或別的基金經理人的績效,當股價跌到價值區時,長期領息,你賺都賺死了,未來在景氣很好時,把股票賣出,賺了三年,五年,十年的息,還賺了差價,這才是致富的方法,每天賺0.3,0.5元,動不動就退出股市,這種人付交易稅、手續費就付到死,錢沒有買股票時就把錢放活存, 賺0.1%的利息,聰明一點的放1%的定存,但實際上比不上買進有價值的股票持有領息好,在你沒有賣出前股價不重要,你要在乎的事是公司一年能配多少殖利率給你,未來股價會不會漲上去,會不會填息,公司淨值會不會持續增加,如果會的話,股價其實不用太在意。
我這樣說好了,你買在台泥、亞泥十年線的位置,意謂著股價平均就在這,貿易戰下,今年賺的錢還是會分股息,明年獲利就算減半,殖利率還是會有3~4%,當股息一直配時,公司還是會賺錢,雖然股價因一時的預期心理或景氣不好而修正,此時股價會就隨著發放股息愈多年股價愈低,當景氣回升時,股息照發,股價回到十年線以上,應該不難吧,畢竟你買在十年均線下,一些來說,景氣好時,股價都會距離十年線上面非常的遠,在景氣不好時,公司獲利或價值還在,你就能持續的加碼,最終出在景氣最好時,這也是為什麼很多人想要股市崩盤買進十年的起漲點,因為他們知道,買在這個點抱十年,不但能賺到十年的股息,還能賺到差價,賺到一次差不多就財富自由了。
[轉]Elasticsearch 解决 memory_lock 问题
https://sukbeta.github.io/2018/11/21/ES-%E8%A7%A3%E5%86%B3-memory-lock-%E9%97%AE%E9%A2%98/
check
http://xxx.xxx.xxx.xxx:9200/_nodes?filter_path=**.mlockall
My way
check
http://xxx.xxx.xxx.xxx:9200/_nodes?filter_path=**.mlockall
My way
services:
  elasticsearch:
    build:
      context: elasticsearch/
    volumes:
      - ./elasticsearch/esdata:/usr/share/elasticsearch/data:rw
      - ./elasticsearch/config/elasticsearch.yml:/usr/share/elasticsearch/config/elasticsearch.yml:ro
    ports:
      - "9200:9200"
      - "9300:9300"
    environment:
      - bootstrap.memory_lock=true
      - "ES_JAVA_OPTS=-Xms512m -Xmx512m"
    ulimits:
      memlock:
        soft: -1
        hard: -1
      nofile:
        soft: 65536
        hard: 65536
    networks:
      - elk
docker iptables part 2
http://sueboy.blogspot.com/2018/11/docker-iptables_12.html
sudo iptables -vnL
======NAT=====
sudo iptables -t nat -vnL
顯示行數
sudo iptables -t nat -L POSTROUTING -n --line-numbers
-D 刪除那行
sudo iptables -t nat -D POSTROUTING x x is which line delete
確認docker網段補上
sudo iptables -t nat -A POSTROUTING -s 172.19.0.0/16 ! -o docker0 -j MASQUERADE
sudo iptables -vnL
======NAT=====
sudo iptables -t nat -vnL
顯示行數
sudo iptables -t nat -L POSTROUTING -n --line-numbers
-D 刪除那行
sudo iptables -t nat -D POSTROUTING x x is which line delete
確認docker網段補上
sudo iptables -t nat -A POSTROUTING -s 172.19.0.0/16 ! -o docker0 -j MASQUERADE
docker volume or create directory, get access deny
https://www.centos.bz/2018/02/%E5%AE%9A%E5%88%B6entrypoint%E8%87%AA%E5%8A%A8%E4%BF%AE%E6%94%B9docker%E4%B8%ADvolume%E7%9A%84%E6%9D%83%E9%99%90/
..........
Other way
1、make shell and run shell, before run docker-compose.
Directory exist and correct Access. 994 or 50 or 1000 see /etc/passwd or /etc/group
2、But sometime OS install docker by you don't know way...
maybe have user dockerroot、group dockerroot or only group docker
you maybe already run sudo usermod -a -G docker $(whoami) 100% in docker group.
A. This time chmod 777 ./data , let docker-compose run
B. ls -al ./data see who make directory or file
C. get this user "user01", chown user01 ./data
D. run docker-compose now have correct aceess Permission
E. chmod 774 ./data
..........
Other way
1、make shell and run shell, before run docker-compose.
mkdir ./data
sudo chown docker ./data
#sudo chown user01 ./data
sudo chmod g+rwx ./data
sudo chgrp 994 ./data
Directory exist and correct Access. 994 or 50 or 1000 see /etc/passwd or /etc/group
2、But sometime OS install docker by you don't know way...
maybe have user dockerroot、group dockerroot or only group docker
you maybe already run sudo usermod -a -G docker $(whoami) 100% in docker group.
A. This time chmod 777 ./data , let docker-compose run
B. ls -al ./data see who make directory or file
C. get this user "user01", chown user01 ./data
D. run docker-compose now have correct aceess Permission
E. chmod 774 ./data
[轉]Redux状态管理之痛点、分析与改良
https://segmentfault.com/a/1190000009540007
WebApp场景下的隐患
举个我曾经在另一篇博客中提到过的例子,一个业务流程有三个页面A/B/C,用户通常按顺序访问它们,每步都会提交一些信息,如果把信息存在Store中,在不刷新的情况下C页面可以直接访问A/B页面存进Store的数据,而一旦用户刷新C页面,这些数据便不复存在,使用这些数据很可能导致程序异常。
它可以从两方面缓解上述问题:
2017.08.27 更新
这个方案在实践中,仍然遇到了一些问题,其中最最重要的,则是替换store后,跨页面action的问题
为了应对这个问题,我考虑了几种方案:
在权衡方案的通用性、理解难度等方面后,目前选择了第一种。
WebApp场景下的隐患
它可以从两方面缓解上述问题:
- 抽象问题:每个Page独立创建store,解决状态树的一对多问题,一个状态树(store)对应一个组件树(page),page在设计store时不用考虑其它页面,仅服务当前页。当然,由于Reducer仍然需要独立于组件树声明,抽象问题并没有根治,面向领域数据和App state的抽象仍然比UI state更自然。它仅仅带给你更大的自由度:不再担心有限的状态树如何设计才能满足近乎无限的UI state。
- 刷新、分享隐患:每个Page创建的Store都是完全不同的对象,且只存在于当前Page生命周期内,其它Page不可能访问到,从根本上杜绝跨页面的store访问。这意味着能够从store中访问到的数据,一定是可靠的。
2017.08.27 更新
这个方案在实践中,仍然遇到了一些问题,其中最最重要的,则是替换store后,跨页面action的问题
为了应对这个问题,我考虑了几种方案:
- 回到应用单一store:pageReducer的特性通过store.replaceReducer完成。当初为每个页面创建store是想让状态彻底隔离,而在replaceReducer后页面之间如果有相同的reducer则状态不会被重置,这是一个担心点。同时一个副作用是牺牲掉每个page定制化middleware的能力
- 为这类跨页面的action建立一个队列,在上个页面将action推进队列,下个页面取出再执行。此方案属于头痛医头,只能解决当前的case,对于websocket等类似问题比较无力。
- 定制thunk middleware,通过闭包获取最新的store
在权衡方案的通用性、理解难度等方面后,目前选择了第一种。
kibana geo_point How to Part 3
Now check again....
1、template_filebeat.json
Can only
Here Import: "location" is Error, Must "geoip.location"
But sometime why no use, because my way insert index-pattern, so geoip.location no field, always is
geoip.location.lat and geoip.location.lon overwrtie.
1、template_filebeat.json
Can only
{
  "index_patterns": ["filebeat*"],
  "settings": {
    "number_of_shards": 1
  },
  "mappings": {
  "doc": {
   "properties": {
    "geoip.location": {
     "type": "geo_point"
        },
    "geoip.coordinates": {
     "type": "geo_point"
        }
   }
  }
 }

}
Here Import: "location" is Error, Must "geoip.location"
But sometime why no use, because my way insert index-pattern, so geoip.location no field, always is
geoip.location.lat and geoip.location.lon overwrtie.
see 2.
2、index-pattern index-pattern-export.json
one way just try to put
{\"name\":\"geoip.location\",\"type\":\"geo_point\",\"count\":0,\"scripted\":false,\"searchable\":true,\"aggregatable\":true,\"readFromDocValues\":true}
and remove geoip.location.lat and geoip.location.lon .
When put template, index in kibana index Patterns delete is NO Use. Must delete in Dev Tools
DELETE filebeat-6.4.2-2018.11.19
GET _cat/indices?v
GET _cat/indices?v&s=index
check exist or not. Then import data again, index recreate, then apply template.
elk ingest plugs pipeline
Filebeat + Elasticsearch + Kibana 轻量日志收集与展示系统
https://wzyboy.im/post/1111.html?utm_source=tuicool&utm_medium=referral
提到
beat -> logstash -> elk
可以
beat -> elk ingest plugs ( Elasticsearch Ingest Node )
与 /_template 类似,Ingest API 位于 /_ingest 下面。用户将 pipeline 定义提交之后,在 Beats 中即可指定某 pipeline 为数据预处理器。
已經內建了
https://www.elastic.co/guide/en/elasticsearch/plugins/6.5/ingest-geoip.html
https://www.elastic.co/guide/en/elasticsearch/plugins/6.5/ingest-user-agent.html

===============
.filebeat
filebeat.yml
補上 like example
output.elasticsearch:

  hosts: ["http://localhost:9200/"]

  pipelines:
    - pipeline: nginx.access
      when.equals:
        fields.type: nginx.access
    - pipeline: nginx.error
      when.equals:
        fields.type: nginx.error
OK, use bottom way to make pipeline.
.pipeline
https://www.elastic.co/guide/en/elasticsearch/reference/current/simulate-pipeline-api.html
https://qbox.io/blog/indexing-elastic-stack-5-0-ingest-apis
https://dev.classmethod.jp/server-side/elasticsearch/elasticsearch-ingest-node/
https://qbox.io/blog/how-to-index-geographical-location-of-ip-addresses-to-elasticsearch-5-0-1
Get a pipeline
GET _ingest/pipeline/geoippipeline
write a pipeline
PUT _ingest/pipeline/geoippipeline
{
  "description" : "Add geoip information to the given IP address",
  "processors": [
    {
      "geoip" :  {
        "field" : "ip",
        "ignore_missing": true
      }
    },
    {
      "geoip" :  {
        "field" : "src_ip",
        "ignore_missing": true
      }
    },
    {
      "geoip" :  {
        "field" : "clientip",
        "ignore_missing": true
      }
    },
    {
      "set" : {
        "field" : "location",
        "value" : "{{geoip.location.lon}}, {{geoip.location.lat}}"
      }
    }
  ]
}
real use pipeline with test data, check is ok.
POST _ingest/pipeline/geoippipeline/_simulate
{
  "docs":[
    {
      "_source": {
        "ip": "8.8.0.0",
        "src_ip": "8.8.0.0",
        "clientip": "8.8.0.0"
      }
    }
  ]
}
Developer test
POST _ingest/pipeline/_simulate
{
  "pipeline": {
  "description" : "parse multiple patterns",
  "processors": [
    {
      "geoip" :  {
        "field" : "ip",
        "ignore_missing": true
      }
    },
    {
      "geoip" :  {
        "field" : "src_ip",
        "ignore_missing": true
      }
    },
    {
      "geoip" :  {
        "field" : "clientip",
        "ignore_missing": true
      }
    },
    {
      "set" : {
        "field" : "location",
        "value" : "{{geoip.location.lon}}, {{geoip.location.lat}}"
      }
    }
  ]
},
"docs":[
  {
    "_source": {
      "ip": "8.8.0.0",
      "src_ip": "8.8.0.0",
      "clientip": "8.8.0.0"
    }
  }
  ]
}
logstash kibana ssh log
1、filebeat /var/log/secure
2、
2、
filter {
  grok {
    #type => "syslog"
    match => ["message", "%{SYSLOGBASE} Failed password for (invalid user |)%{USERNAME:username} from %{IP:src_ip} port %{BASE10NUM:port} ssh2"]
    add_tag => "ssh_brute_force_attack"
  }
  grok {
    #type => "syslog"
    match => ["message", "%{SYSLOGBASE} Accepted password for %{USERNAME:username} from %{IP:src_ip} port %{BASE10NUM:port} ssh2"]
    add_tag => "ssh_sucessful_login"
  }

  geoip {
    source => "src_ip"
    target => "geoip"
    add_tag => [ "ssh-geoip" ]
    add_field => [ "[geoip][coordinates]", "%{[geoip][longitude]}" ]
    add_field => [ "[geoip][coordinates]", "%{[geoip][latitude]}"  ]
    add_field => [ "geoipflag", "true" ]
  }

}
kibana geo_point How to Part 2
Step:
.Change Kibana & elk order. Now elk import template_filebeat, then wait logstash put log to elk. elk can get index EX:filebeat-6.4.2-2018.11.19 filebeat-6.4.2-2018.11.20
Then kibana import index-partten and set default.
.template_filebeat template_filebeat.json
* template_filebeat.json is from
GET _cat/indices?v
you can see some index like //GET _cat/indices?v&s=index

GET filebeat-6.4.2-2018.11.19

ok use your mappings replace this mappings
Only replace mappings. Official website have example.
https://www.elastic.co/guide/en/elasticsearch/reference/current/indices-templates.html
And Change
"coordinates": {
"type": "float" => "geo_point"
},
Save file name:template_filebeat.json
Usually new docker elk logstash already have geoip. add_field like picture and mutate add some item. Here is change type with templates.

So this step mean you must let logstash send log to elk, get fileds to become template.
.index-partten index-pattern-export.json
see this url, know how to do
https://sueboy.blogspot.com/2018/11/kibana-default-index-pattern.html
Important:Do this must refresh, then export json that is corrent file.

Now 100% can see map.
.Change Kibana & elk order. Now elk import template_filebeat, then wait logstash put log to elk. elk can get index EX:filebeat-6.4.2-2018.11.19 filebeat-6.4.2-2018.11.20
Then kibana import index-partten and set default.
#!/bin/bash

echo '@edge http://dl-cdn.alpinelinux.org/alpine/edge/main' >> /etc/apk/repositories
echo '@edge http://dl-cdn.alpinelinux.org/alpine/edge/community' >> /etc/apk/repositories
echo '@edge http://dl-cdn.alpinelinux.org/alpine/edge/testing' >> /etc/apk/repositories
apk --no-cache upgrade
apk --no-cache add curl

echo "=====Elk config ========"
until echo | nc -z -v elasticsearch 9200; do
    echo "Waiting Elk Kibana to start..."
    sleep 2
done

code="400"
until [ "$code" != "400" ]; do
    echo "=====Elk importing mappings json ======="
    curl -v -XPUT elasticsearch:9200/_template/template_filebeat -H 'Content-Type: application/json' -d @/usr/share/elkconfig/config/template_filebeat.json 2>/dev/null | head -n 1 | cut -d ':' -f2|cut -d ',' -f1 > code.txt
    code=`cat code.txt`
    sleep 2
done


#reload index for geo_point
echo "=====Get kibana idnex lists ======="
indexlists=()
while [ ${#indexlists[@]} -eq 0 ]
do
    sleep 2
    indexlists=($(curl -s elasticsearch:9200/_aliases?pretty=true | awk -F\" '!/aliases/ && $2 != "" {print $2}' | grep filebeat-))
done

sleep 10


#========kibana=========
id="f1836c20-e880-11e8-8d66-7d7b4c3a5906"

echo "=====Kibana default index-pattern ========"
until echo | nc -z -v kibana 5601; do
    echo "Waiting for Kibana to start..."
    sleep 2
done

code="400"
until [ "$code" != "400" ]; do
    echo "=====kibana importing json ======="
    curl -v -XPOST kibana:5601/api/kibana/dashboards/import?force=true -H "kbn-xsrf:true" -H "Content-type:application/json" -d @/usr/share/elkconfig/config/index-pattern-export.json 2>/dev/null | head -n 1 | cut -d ':' -f2|cut -d ',' -f1 > code.txt
    code=`cat code.txt`
    sleep 2
done

code="400"
until [ "$code" != "400" ]; do
    curl -v -XPOST kibana:5601/api/kibana/settings/defaultIndex -H "kbn-xsrf:true"  -H "Content-Type: application/json" -d "{\"value\": \"$id\"}"  2>/dev/null | head -n 1 | cut -d ':' -f2|cut -d ',' -f1 > code.txt
    code=`cat code.txt`
    sleep 2
done

tail -f /dev/null
.template_filebeat template_filebeat.json
* template_filebeat.json is from
GET _cat/indices?v
you can see some index like //GET _cat/indices?v&s=index

GET filebeat-6.4.2-2018.11.19

ok use your mappings replace this mappings
{
  "index_patterns": ["filebeat*"],
  "settings": {
    "number_of_shards": 1
  },
  "mappings": {
    "doc": {
      "properties": {
        "@timestamp": {
          "type": "date"
        },

  ...

}
Only replace mappings. Official website have example.
https://www.elastic.co/guide/en/elasticsearch/reference/current/indices-templates.html
And Change
"coordinates": {
"type": "float" => "geo_point"
},
Save file name:template_filebeat.json
Usually new docker elk logstash already have geoip. add_field like picture and mutate add some item. Here is change type with templates.

So this step mean you must let logstash send log to elk, get fileds to become template.
.index-partten index-pattern-export.json
see this url, know how to do
https://sueboy.blogspot.com/2018/11/kibana-default-index-pattern.html
Important:Do this must refresh, then export json that is corrent file.

Now 100% can see map.
[轉]有便宜的4g分享器嗎
https://www.mobile01.com/topicdetail.php?f=18&t=5638571&p=1
E8372h-153
https://shopee.tw/-%E7%8F%BE%E8%B2%A8-%E5%8F%AF%E5%9B%9E%E5%BE%A9%E5%87%BA%E5%BB%A0%E5%80%BC-%E4%BF%9D%E5%9B%BA%E4%B8%80%E5%B9%B4%EF%BC%BD%E8%8F%AF%E7%82%BA-E8372h-153-4G-Wifi%E5%88%86%E4%BA%AB-E8372-E8372-153-i.24086409.308705863
E8372h-153
https://shopee.tw/-%E7%8F%BE%E8%B2%A8-%E5%8F%AF%E5%9B%9E%E5%BE%A9%E5%87%BA%E5%BB%A0%E5%80%BC-%E4%BF%9D%E5%9B%BA%E4%B8%80%E5%B9%B4%EF%BC%BD%E8%8F%AF%E7%82%BA-E8372h-153-4G-Wifi%E5%88%86%E4%BA%AB-E8372-E8372-153-i.24086409.308705863
[Failed again!!] kibana geo_point How to
Fxxx kibana elk Now try to do again. But can't get geo_point....
reindex no use
No Use
POST /_refresh
POST /_flush/synced
POST /_cache/clear
Wast time Fxxx system.
..................
..................
..................
..................
..................
..................
..................
..................
..................
..................
..................
..................
..................
..................
..................
very bad document, very bad change version............Everythings is BAD for elk kibana
1、 Every time see this "PUT GET or DELETE" command. Use where ???
https://www.elastic.co/guide/en/elasticsearch/reference/current/docs-get.html

Use in Kibana

AND Question is curl

2、Please Watch 6.5 Not old version

You maybe see many document on Internet that check version First.
3、Before geo_point
keep this command : (or find Internet know this mean)
GET _cat/
GET _cat/indices?v
GET _cat/indices?v&s=index
GET /_settings
GET filebeat*
GET /_template
PUT _template/template_filebeat
POST _reindex
=================Begin================
Firest Must already have default index

If want to auto, see http://sueboy.blogspot.com/2018/11/kibana-default-index-pattern.html
Second
* template_filebeat.json is from
GET _cat/indices?v
you can see some index like
GET filebeat-6.4.2-2018.11.19
ok use your mappings replace this mappings
Only replace mappings. Official website have example.
https://www.elastic.co/guide/en/elasticsearch/reference/current/indices-templates.html
And Change
"coordinates": {
"type": "float" => "geo_point"
},
Save file name:template_filebeat.json
Usually new docker elk logstash already have geoip. add_field like picture and mutate add some item. Here is change type with templates.
Back shell, move to =====Get kibana idnex lists=====
This is get use indexlist now after used late.
Then reindex
Why do this Because reindex let geo_point remake. Already inside index. corrdinates type is float.
If you want to change type, usually get error or maybe success, success is fake.


So only use reindex, let it can do.
https://medium.com/@sami.jan/fundamentals-of-elasticsearch-cbb273160f60
I think use docker elk logstash kibana that want to use quickly. Setting config must set default. Change config only use docker image offer. So docker image No offer and don't change docker image, only use API. But API not everything same use config.
All step
1、elk put template for geo_point
"coordinates": {
"type": "geo_point"
},
2、get already used idnex
3、reindex a -> a_reindex
4、Visualize -> create a visualizaition -> Coordinate Map -> choese Filter "filebeat-*" Maybe your different name, by default index
-> Buckets -> Geo Coordinates -> Aggregation -> Geohash -> Field -> Geoip.coordinates (geo_point) -> RUN
Now 100% can see map.
reindex no use
No Use
POST /_refresh
POST /_flush/synced
POST /_cache/clear
Only do this can apply
Wast time Fxxx system.
..................
..................
..................
..................
..................
..................
..................
..................
..................
..................
..................
..................
..................
..................
..................
very bad document, very bad change version............Everythings is BAD for elk kibana
1、 Every time see this "PUT GET or DELETE" command. Use where ???
https://www.elastic.co/guide/en/elasticsearch/reference/current/docs-get.html

Use in Kibana

AND Question is curl

2、Please Watch 6.5 Not old version

You maybe see many document on Internet that check version First.
3、Before geo_point
keep this command : (or find Internet know this mean)
GET _cat/
GET _cat/indices?v
GET _cat/indices?v&s=index
GET /_settings
GET filebeat*
GET /_template
PUT _template/template_filebeat
POST _reindex
=================Begin================
Firest Must already have default index

If want to auto, see http://sueboy.blogspot.com/2018/11/kibana-default-index-pattern.html
Second
#!/bin/bash

echo '@edge http://dl-cdn.alpinelinux.org/alpine/edge/main' >> /etc/apk/repositories
echo '@edge http://dl-cdn.alpinelinux.org/alpine/edge/community' >> /etc/apk/repositories
echo '@edge http://dl-cdn.alpinelinux.org/alpine/edge/testing' >> /etc/apk/repositories
apk --no-cache upgrade
apk --no-cache add curl

echo "=====Elk config ========"
until echo | nc -z -v elasticsearch 9200; do
    echo "Waiting Elk Kibana to start..."
    sleep 2
done

code="400"
until [ "$code" != "400" ]; do
    echo "=====Elk importing mappings json ======="
    curl -v -XPUT elasticsearch:9200/_template/template_filebeat -H 'Content-Type: application/json' -d @/usr/share/elkconfig/config/template_filebeat.json 2>/dev/null | head -n 1 | cut -d ':' -f2|cut -d ',' -f1 > code.txt
    code=`cat code.txt`
    sleep 2
done

#reload index for geo_point
echo "=====Get kibana idnex lists ======="
indexlists=()
while [ ${#indexlists[@]} -eq 0 ]
do
    sleep 2
    indexlists=($(curl -s elasticsearch:9200/_aliases?pretty=true | awk -F\" '!/aliases/ && $2 != "" {print $2}' | grep filebeat-))
done

for i in "${indexlists[@]}"
do
    echo "=====reindex filebeat for geo_point ======="
    curl -v -XPOST "http://elasticsearch:9200/_reindex" -H 'Content-Type: application/json' -d'{ "source": { "index": "'$i'" }, "dest": { "index": "'$i-reindex'" } }'
done

#curl -XDELETE "http://elasticsearch:9200/filebeat-*"
#curl -XPUT "http://elasticsearch:9200/filebeat"

tail -f /dev/null
* template_filebeat.json is from
GET _cat/indices?v
you can see some index like
GET filebeat-6.4.2-2018.11.19
ok use your mappings replace this mappings
{
  "index_patterns": ["filebeat*"],
  "settings": {
    "number_of_shards": 1
  },
  "mappings": {
    "doc": {
      "properties": {
        "@timestamp": {
          "type": "date"
        },

  ...

}
Only replace mappings. Official website have example.
https://www.elastic.co/guide/en/elasticsearch/reference/current/indices-templates.html
And Change
"coordinates": {
"type": "float" => "geo_point"
},
Save file name:template_filebeat.json
Usually new docker elk logstash already have geoip. add_field like picture and mutate add some item. Here is change type with templates.
Back shell, move to =====Get kibana idnex lists=====
This is get use indexlist now after used late.
Then reindex
Why do this Because reindex let geo_point remake. Already inside index. corrdinates type is float.
If you want to change type, usually get error or maybe success, success is fake.


So only use reindex, let it can do.
https://medium.com/@sami.jan/fundamentals-of-elasticsearch-cbb273160f60
I think use docker elk logstash kibana that want to use quickly. Setting config must set default. Change config only use docker image offer. So docker image No offer and don't change docker image, only use API. But API not everything same use config.
All step
1、elk put template for geo_point
"coordinates": {
"type": "geo_point"
},
2、get already used idnex
3、reindex a -> a_reindex
4、Visualize -> create a visualizaition -> Coordinate Map -> choese Filter "filebeat-*" Maybe your different name, by default index
-> Buckets -> Geo Coordinates -> Aggregation -> Geohash -> Field -> Geoip.coordinates (geo_point) -> RUN
訂閱:
文章 (Atom)